

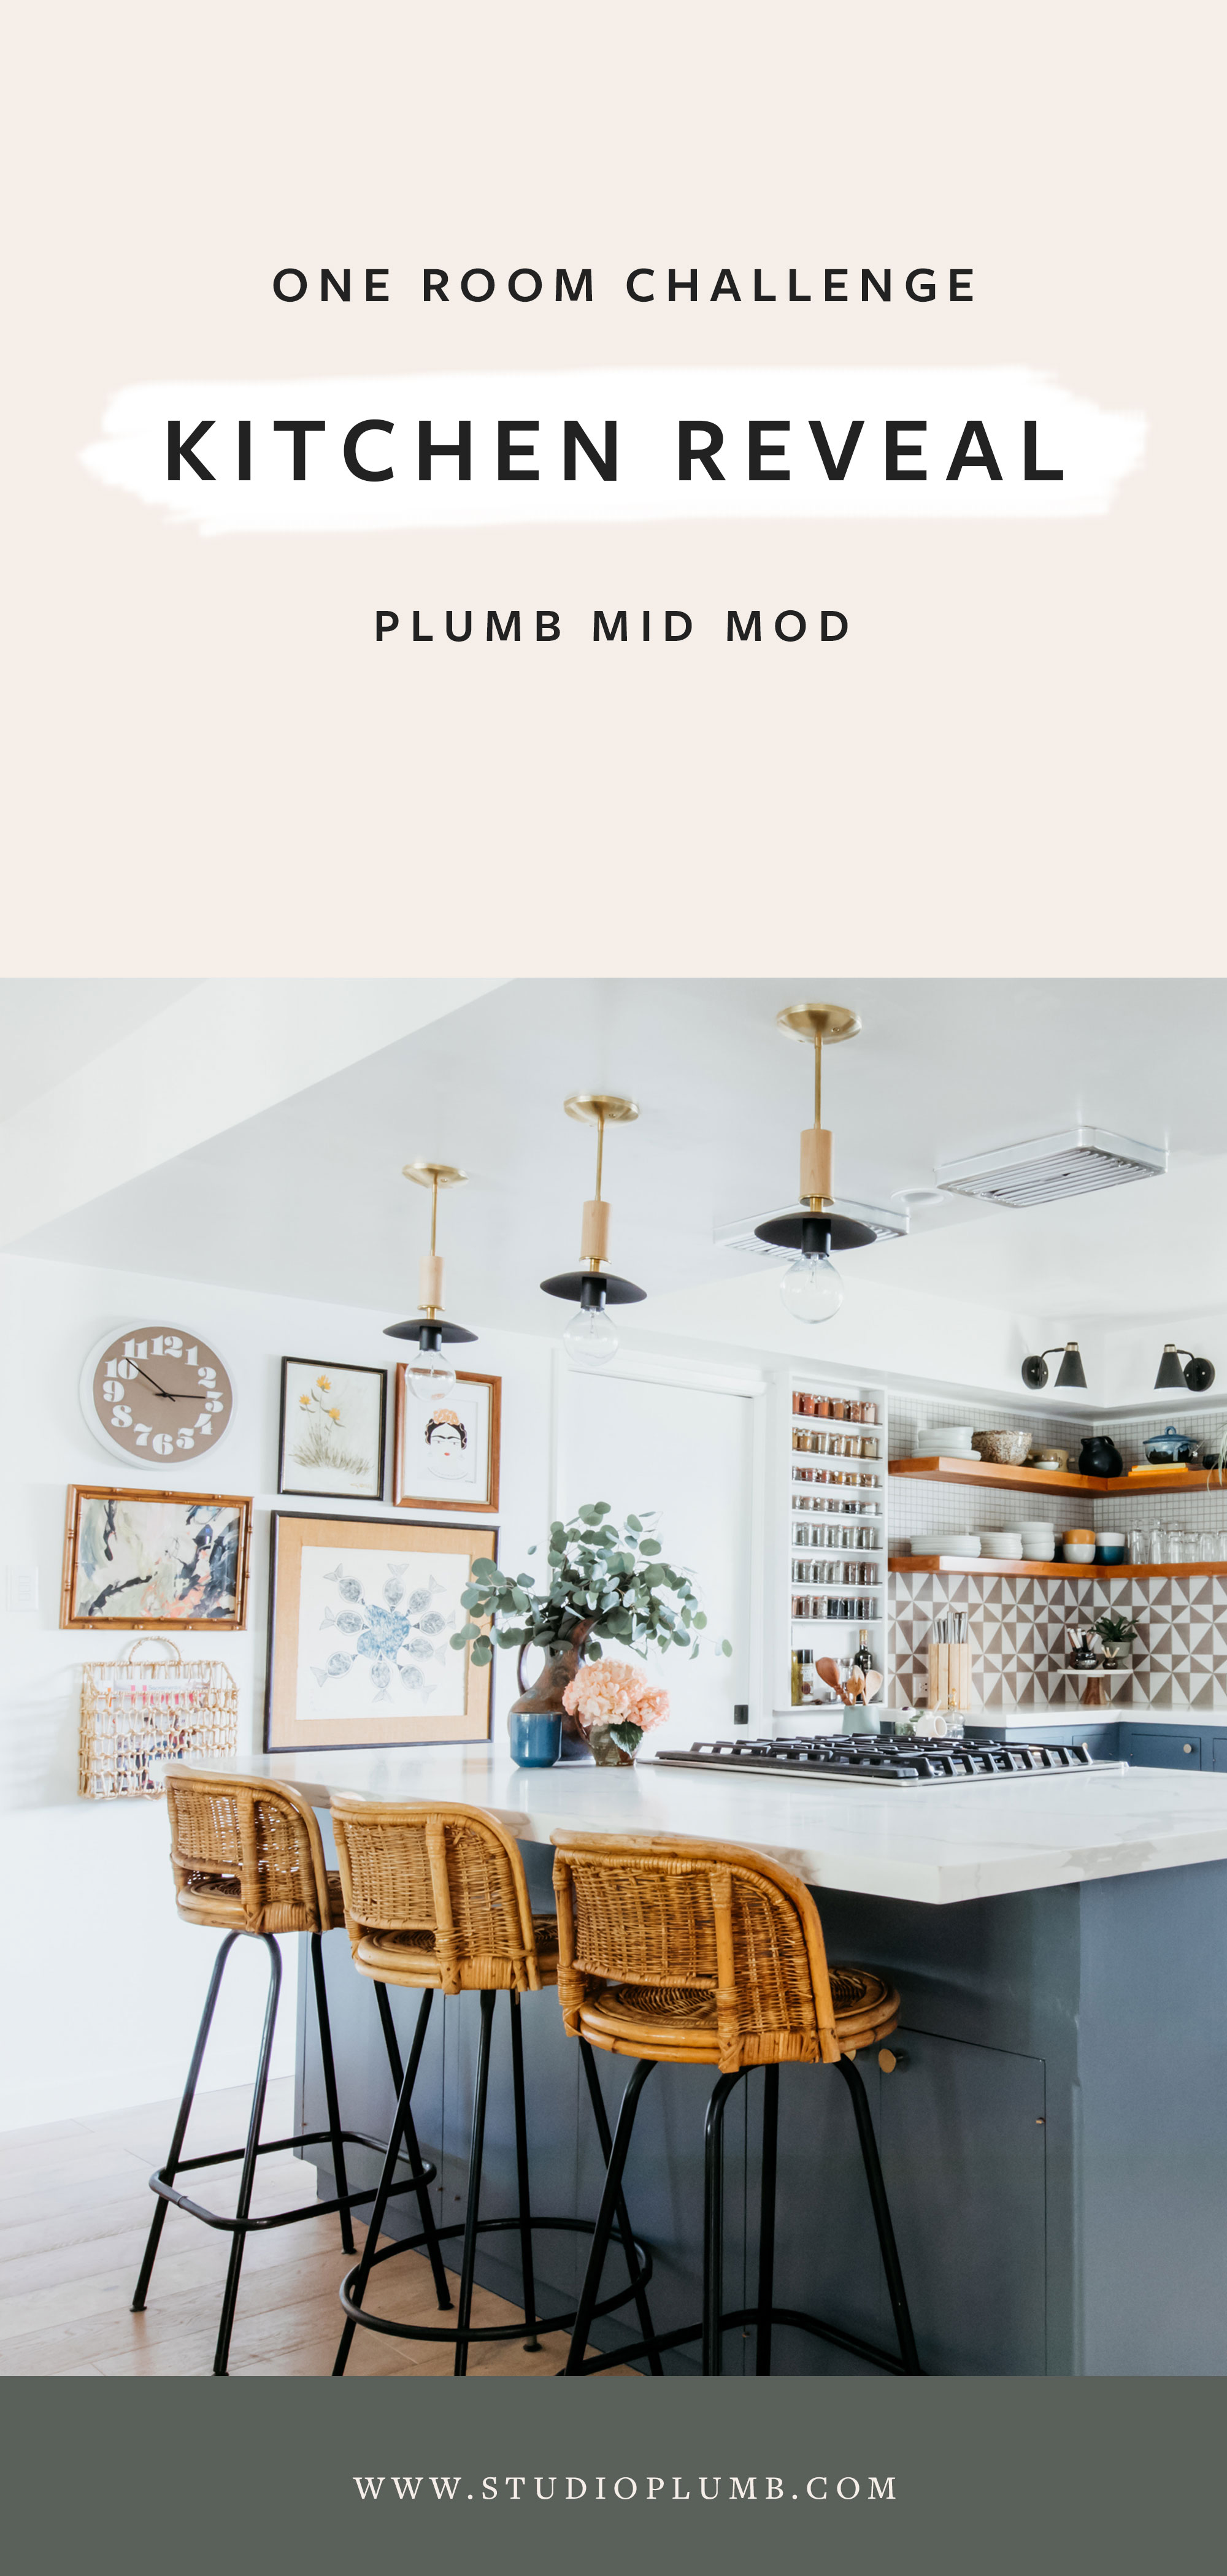
We made it!!! Week 6 and it’s reveal day. I’m excited, nervous, but mostly excited to share this final step in the journey with you today. I can’t wait to see everyone else’s final room reveals, it’s like the last day of finals week and it’s time to sign yearbooks.
So here she is…
Catch up with our entire One Room Challenge kitchen reno
Week 1 // Week 2 // Week 3 // Week 4 // Week 5
40 days ago we ripped out our upper cabinets and demolished our tired, 90’s ivory tile countertops without looking back. I had been scheming ways of making this kitchen renovation happen for years so I’m still a little surprised each time I walk through the back door and see how pretty it is. I feel so lucky to live here, the people in my life who helped make it happen, and everyone I’ve ‘met’ online throughout this process. Its been stressful and gross to live through, but I’ve had the time of my life.
Out of everything I learned on this, honing my personal style is at the top of the list. I’ve always had one, but this feels the most ‘me.’ Its where my love of bold, graphic patterns and organic handmade came together. I’m calling it Earthy Geometric.
I know you’re dying to see more of the results, but I have to take a trip down memory lane, lest we forget how far we’ve come.
Here is how it looked when we bought the house 2 years ago:
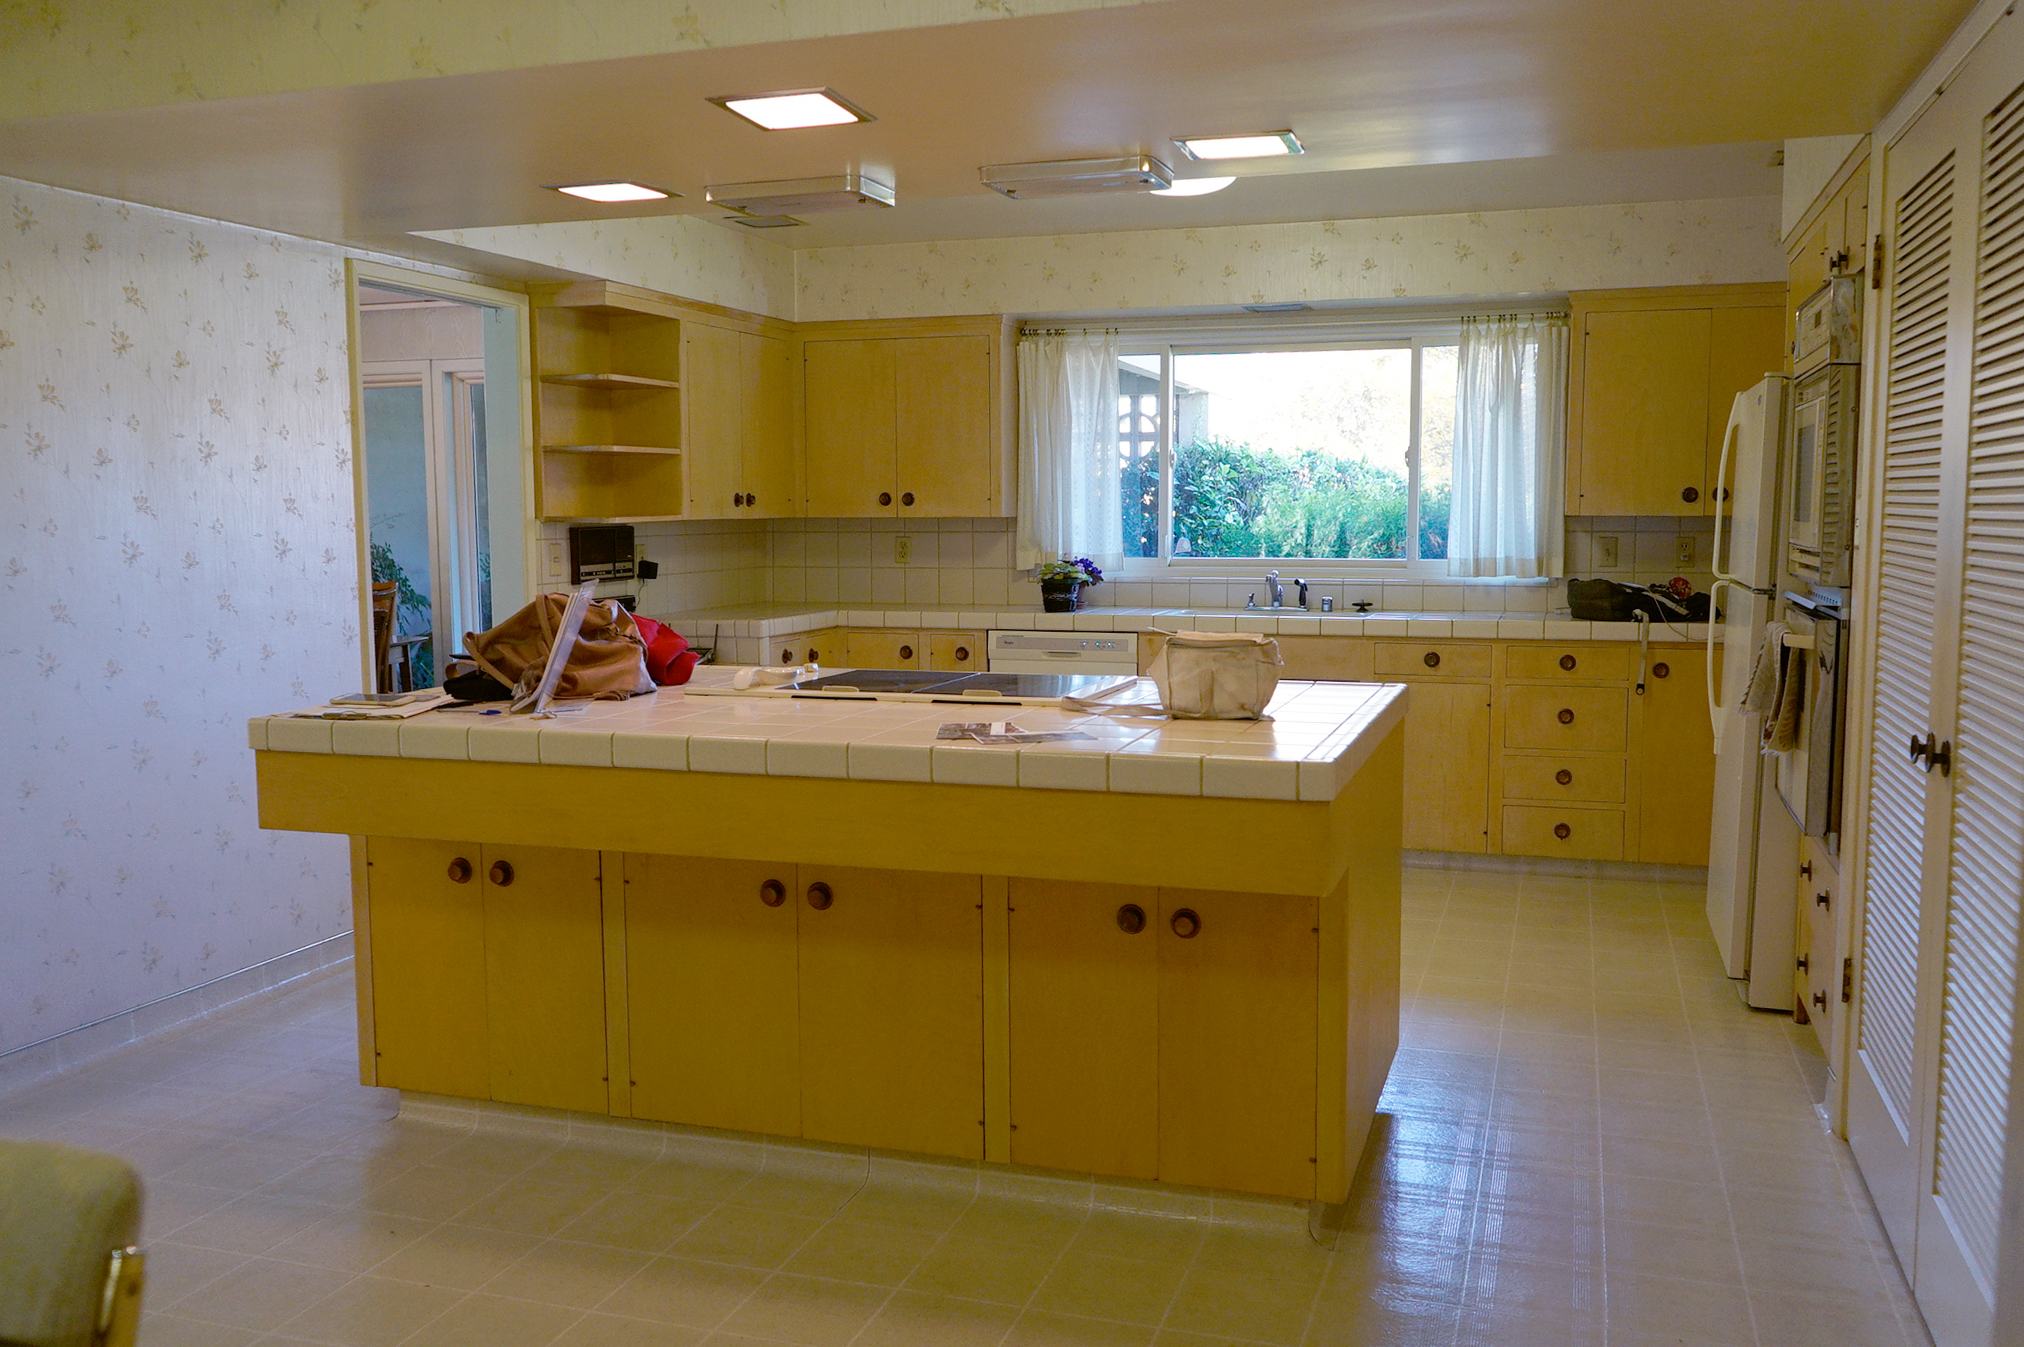
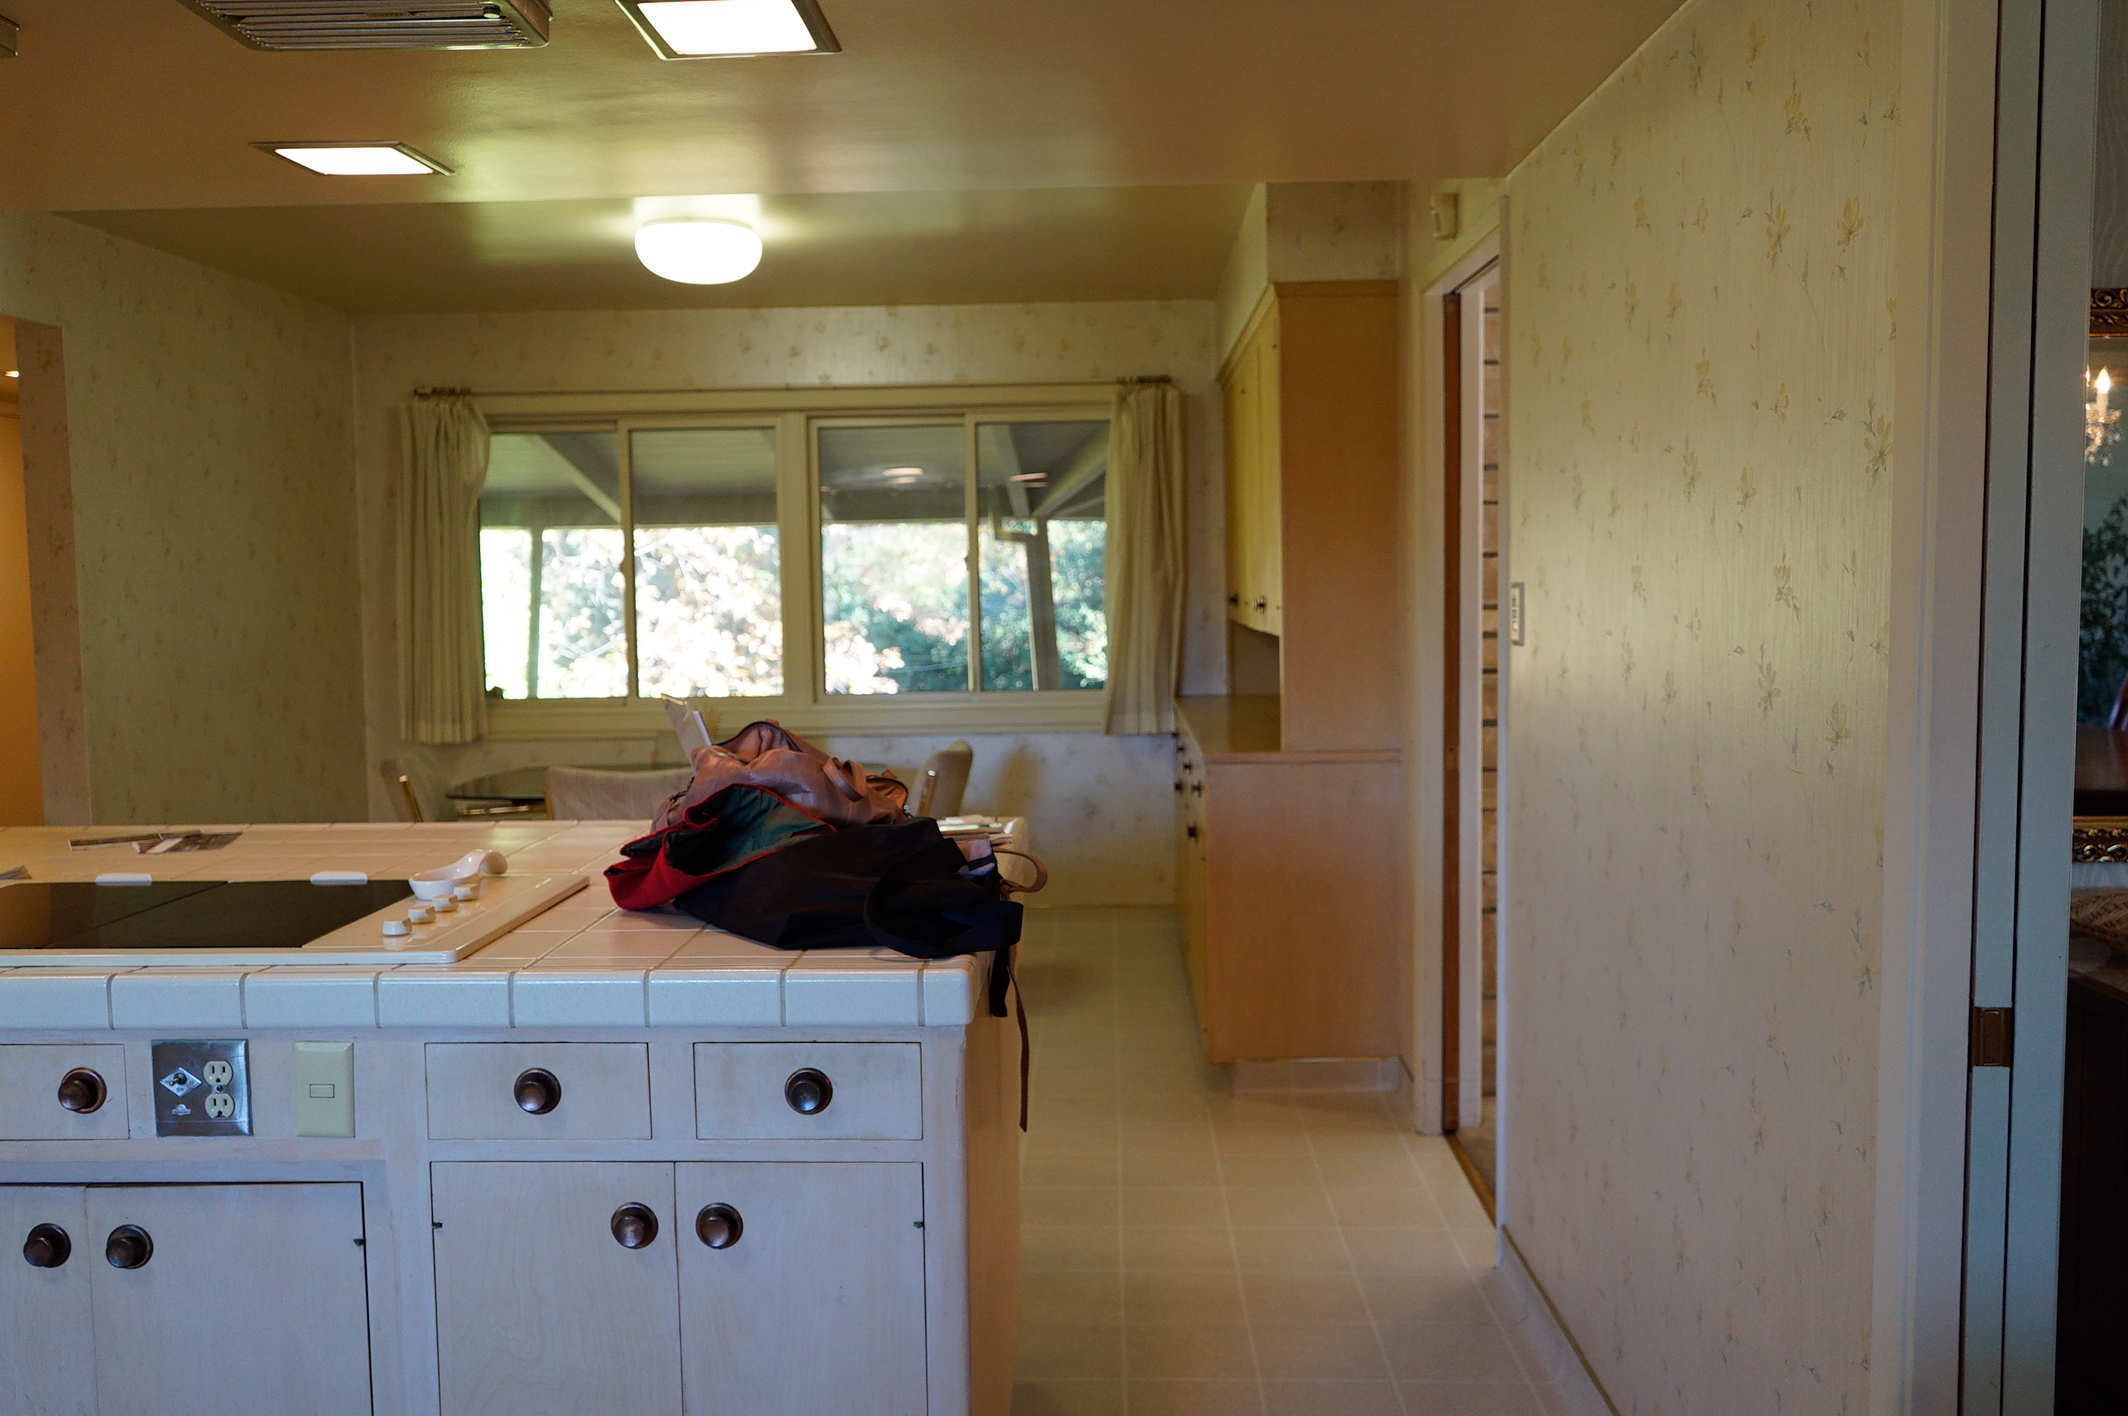
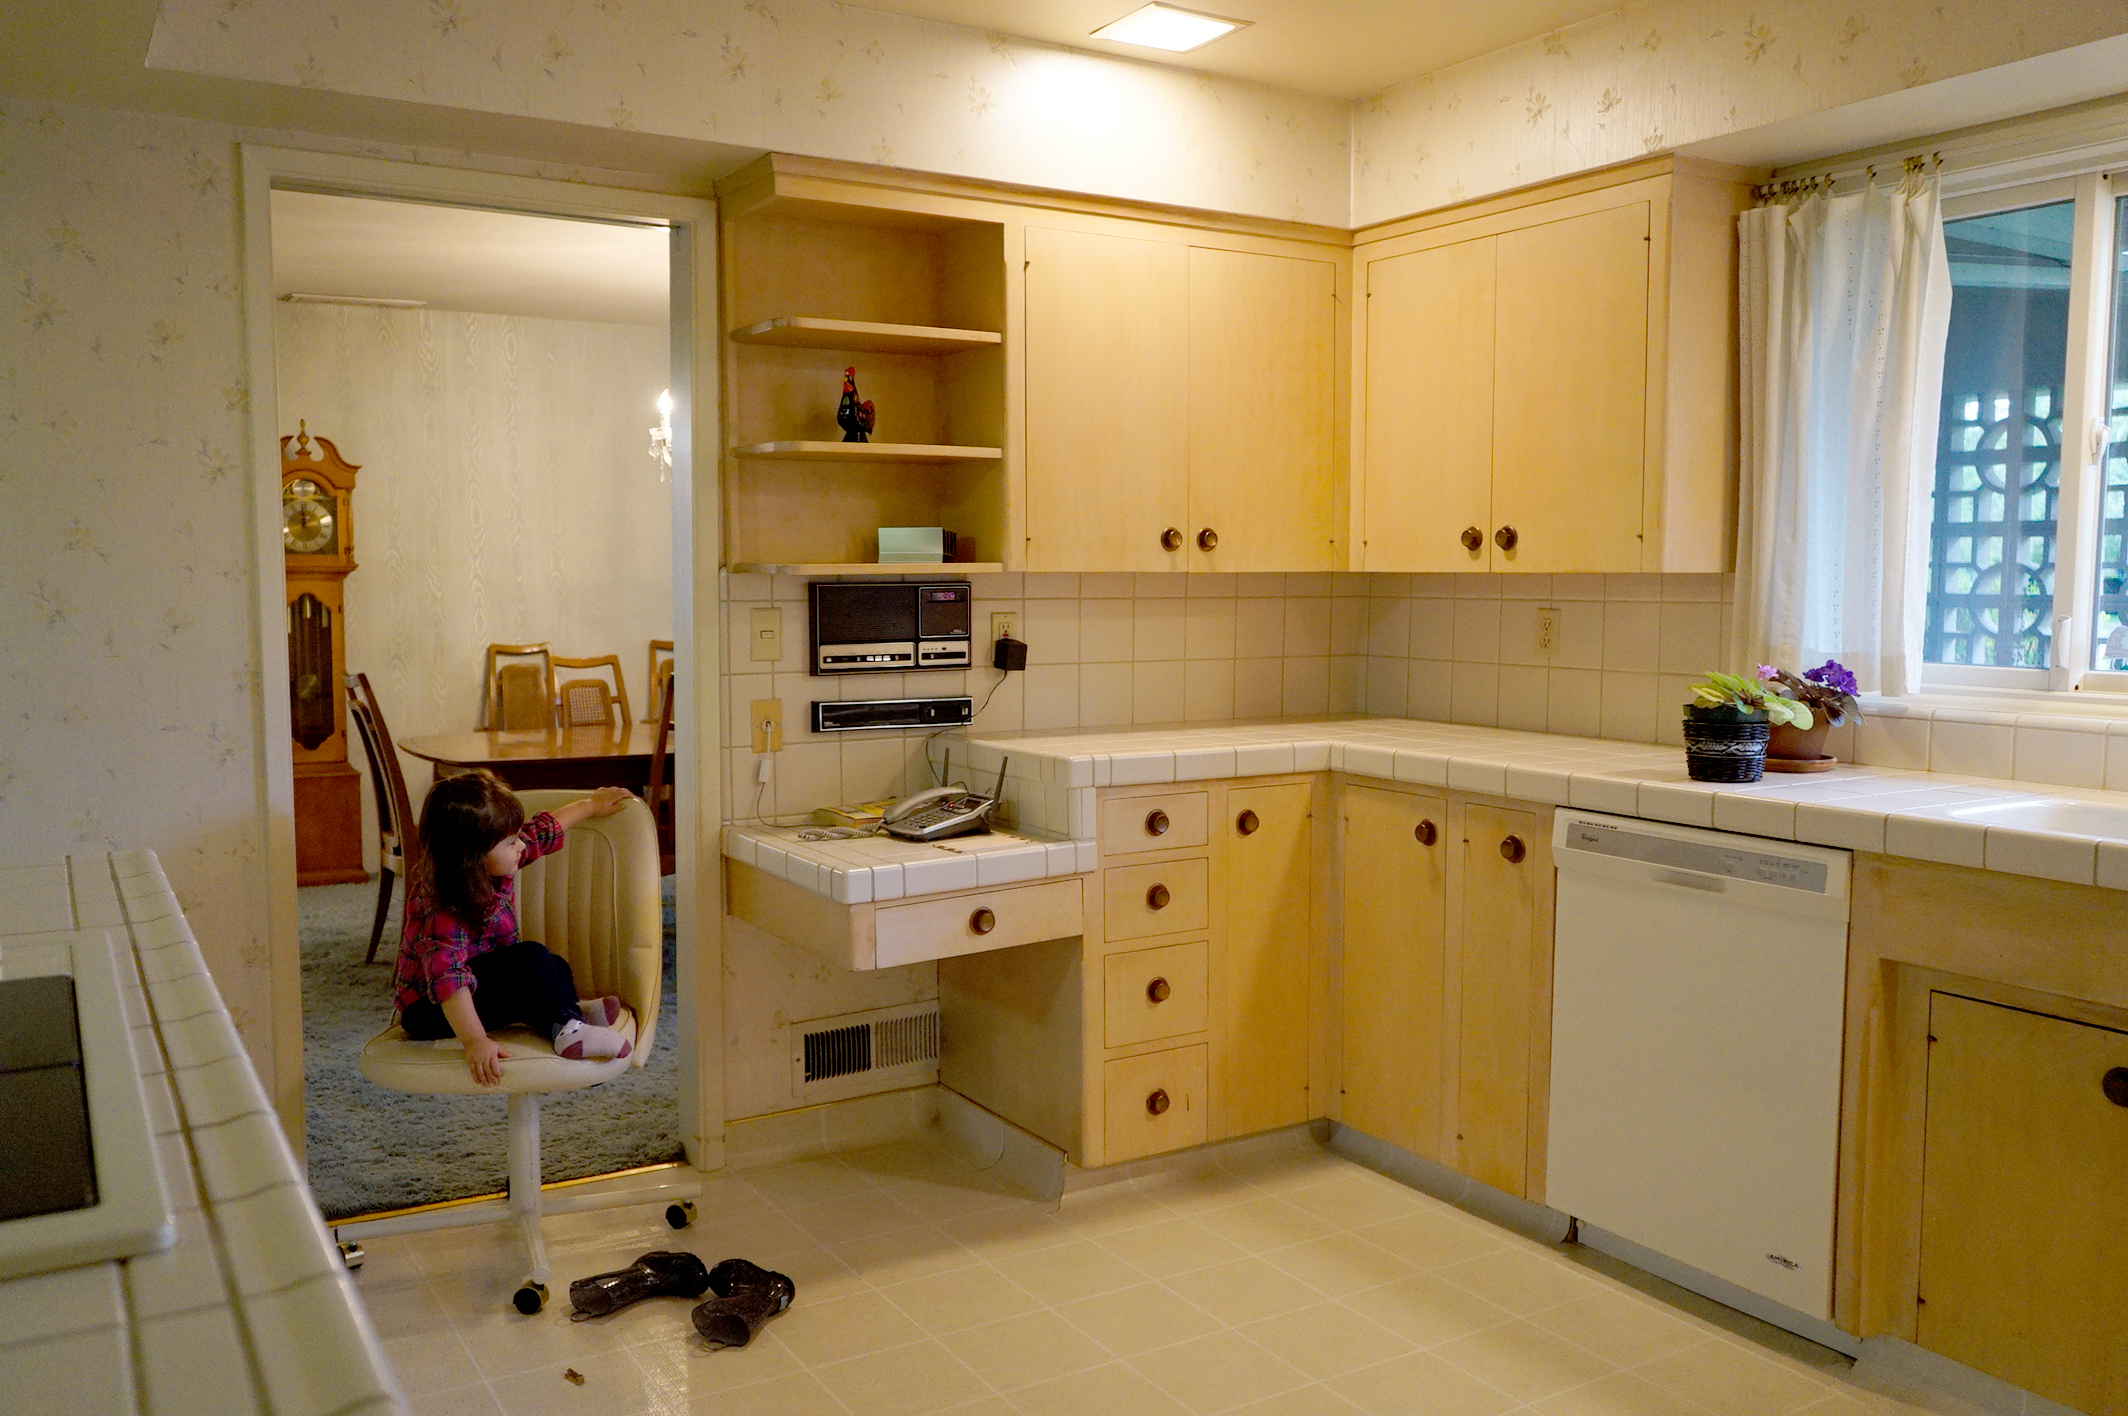
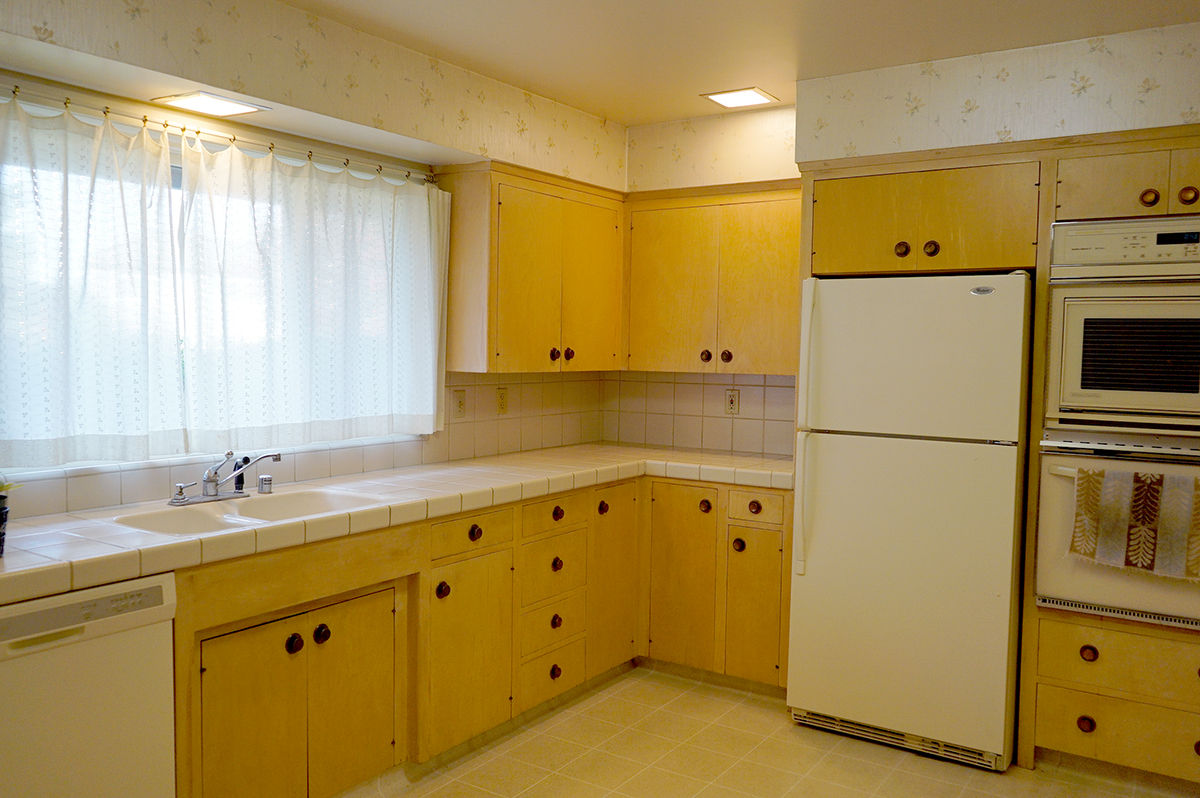
Ummm, ya. Blech, boring, yellow-y beige. Not my jam one single bit.
Quick Overview
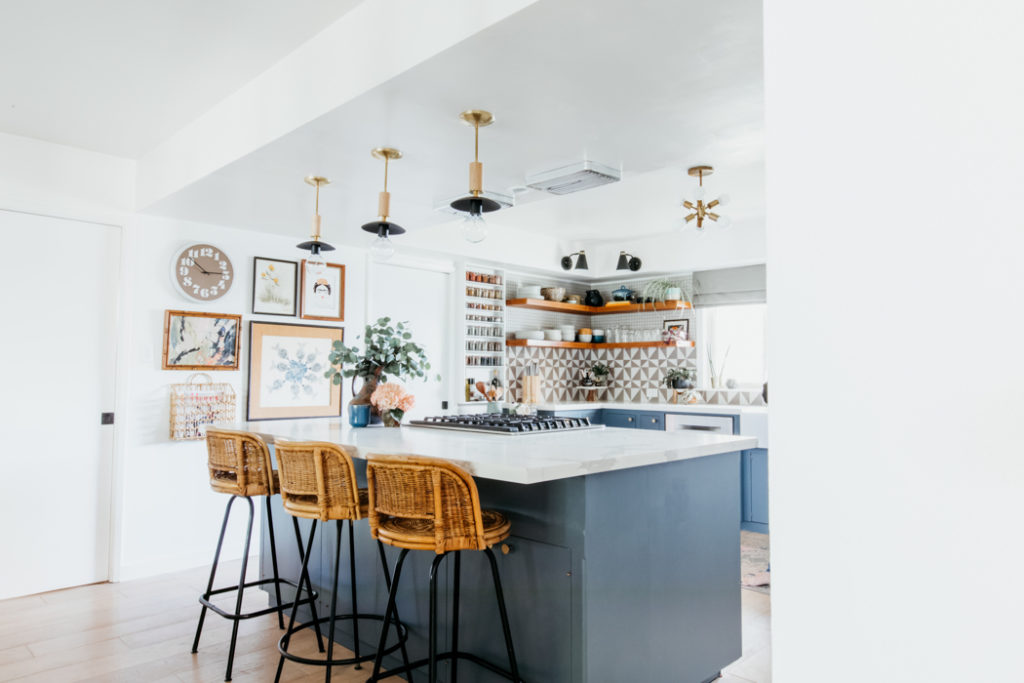
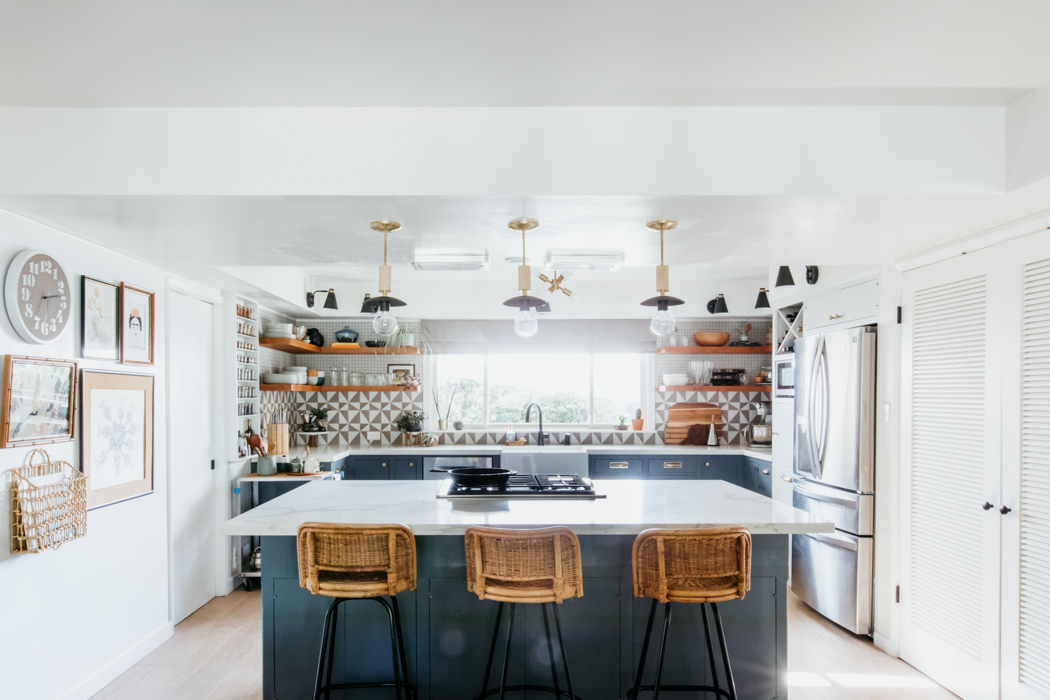
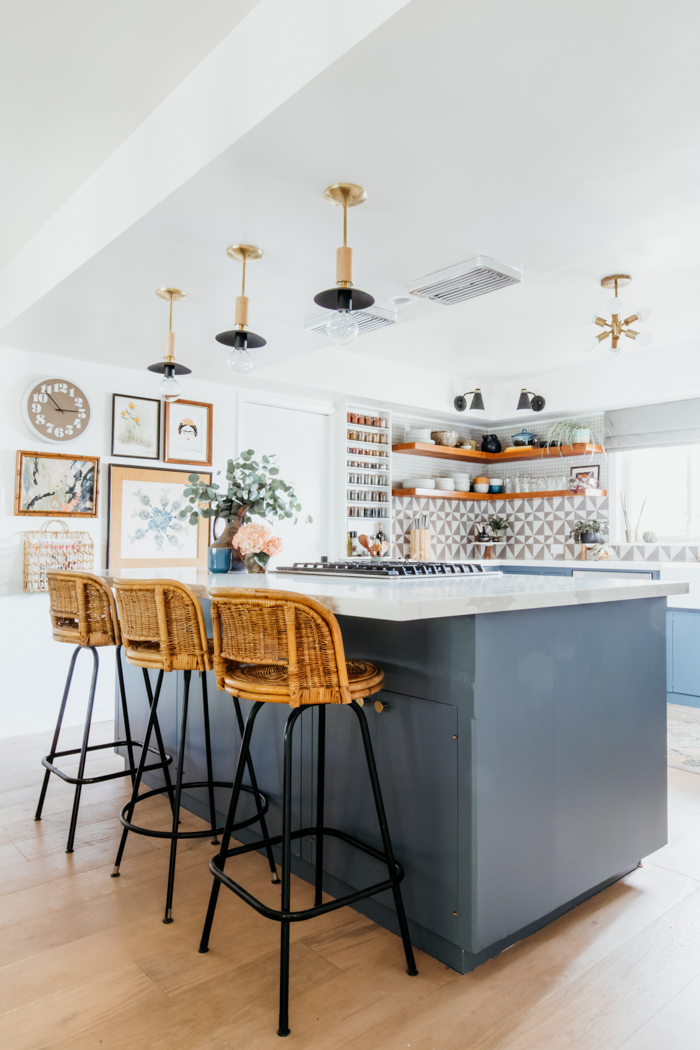
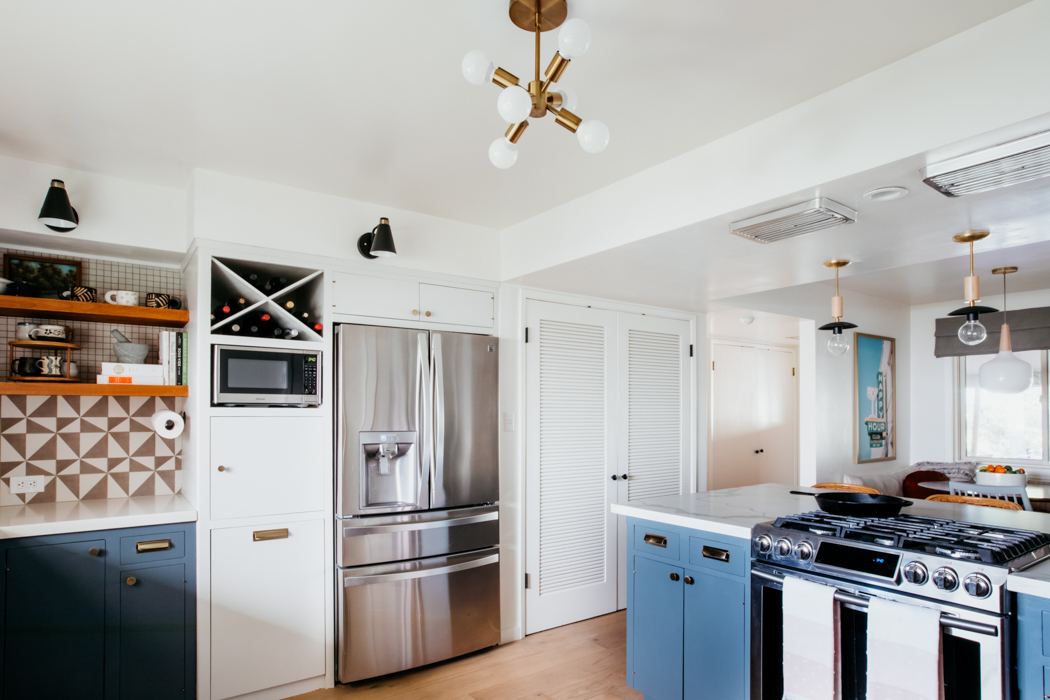
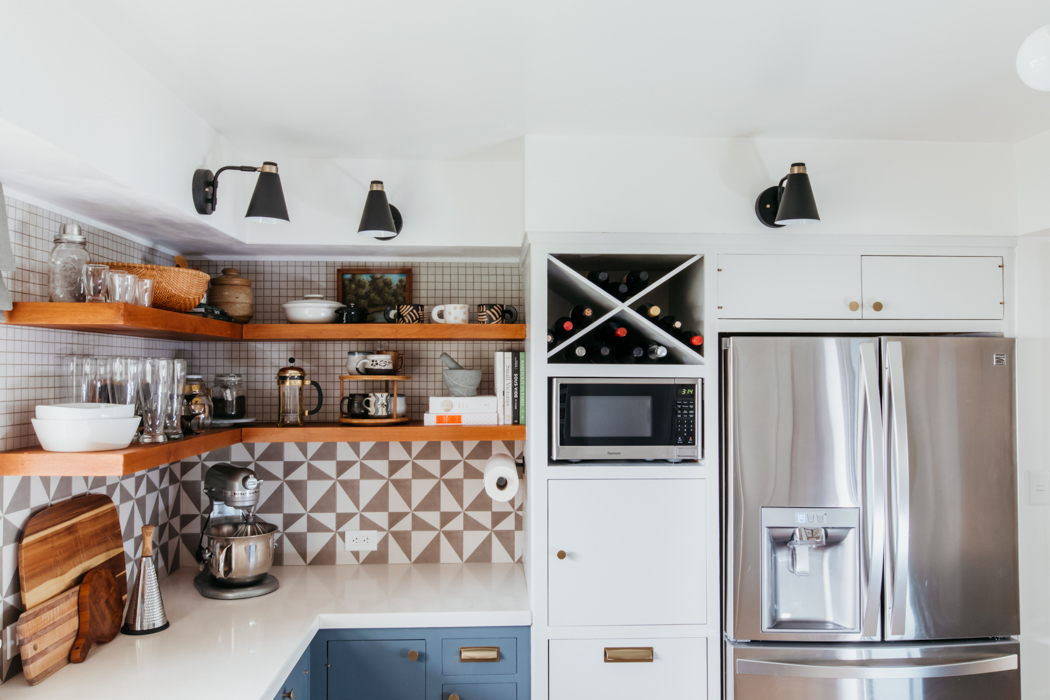
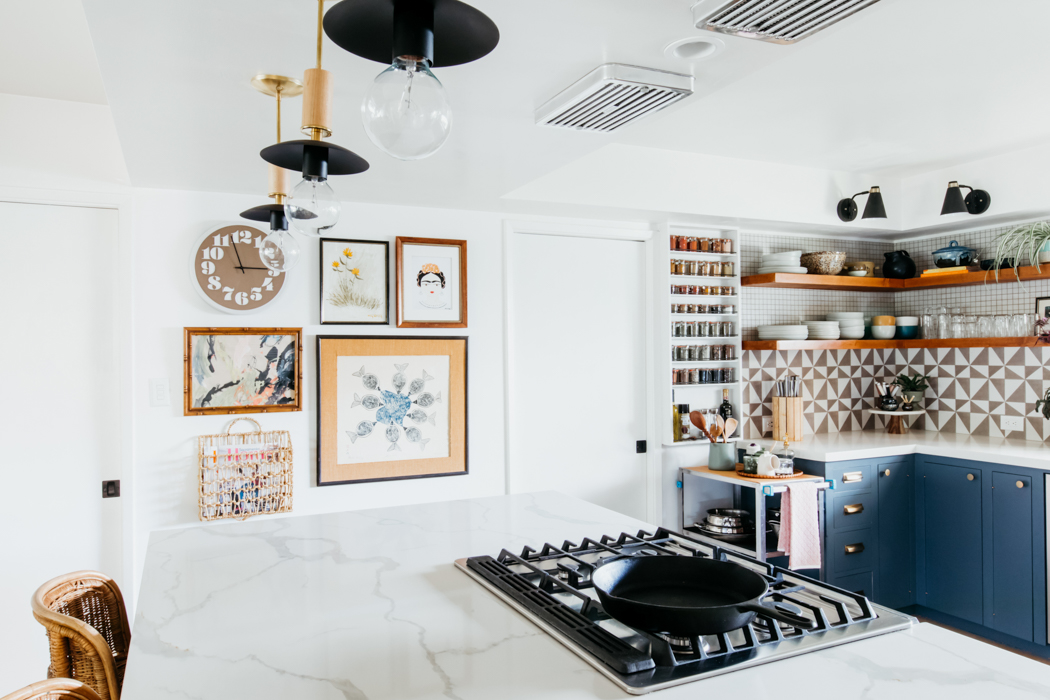
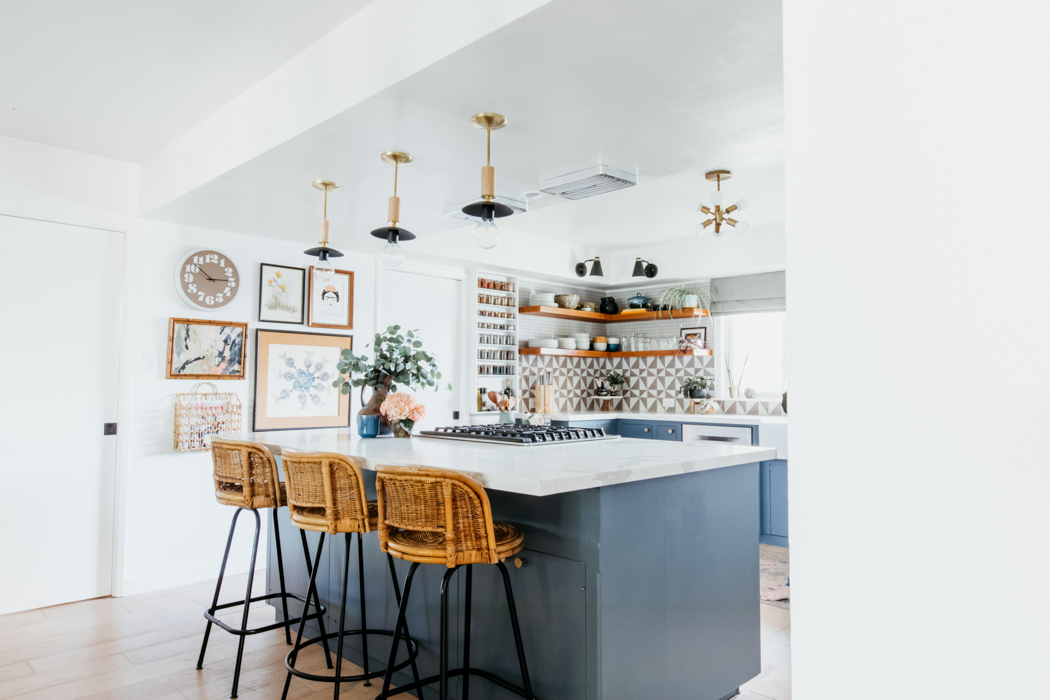
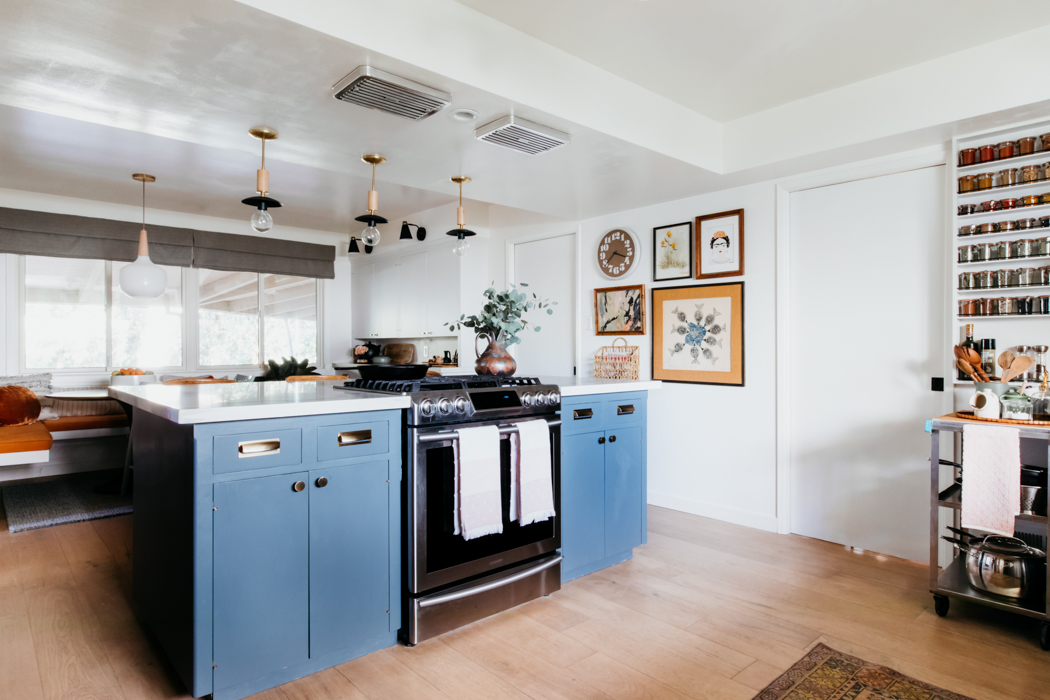
We kept the plywood cabinets and basic layout from the original 1960 kitchen. Before we moved in we removed the wallpaper and replaced the flooring. Last November did some appliance updating and slight reconfigurations (see those updates in this post) but aside from that we’ve lived in a beige-on-beige-on-beige space with a gross, old whistling sink and zero organization. When I met my dream tile from Natural Stone Design Gallery the design clicked and it became my jumping off point for everything else. So basically we only updated surfaces, lighting and appliances (ok, and lots of accessories) to achieve this mind-blowing transformation.
But its not only pretty, its exponentially more functional. We actually have less counter space when we removed that small, dumb little desk, but I feel like our usable surface doubled in size. Between the upper cabinet removal, and smooth countertops, its so much more inviting.
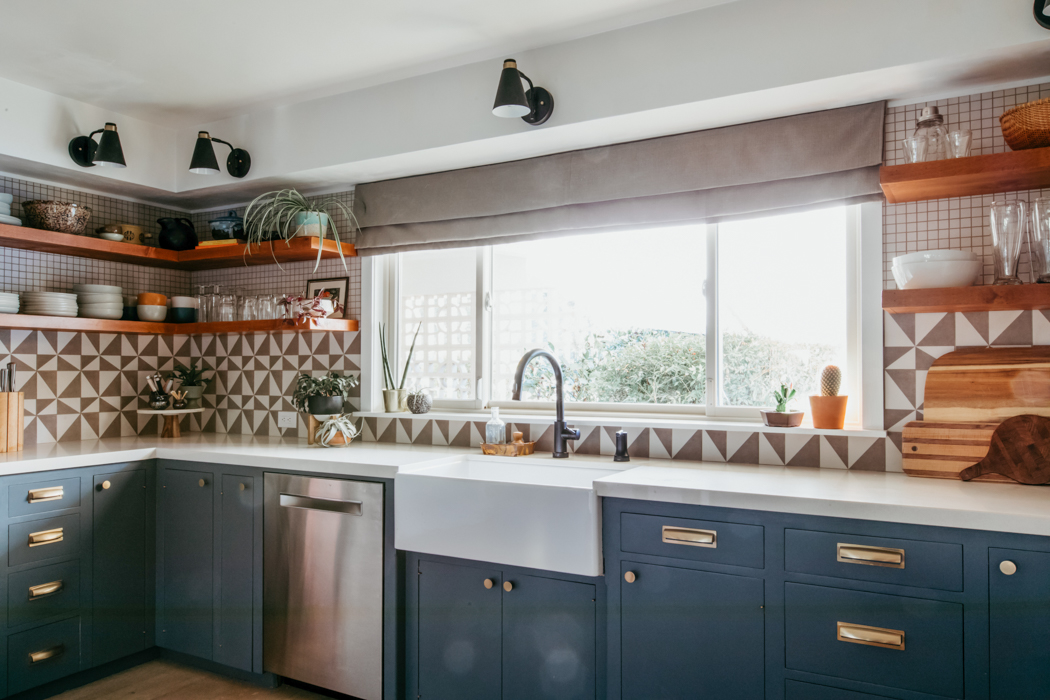
To be honest, I was still hemming and hawing on whether we’d take this on until Natural Stone Design Gallery agreed to partner with me for the One Room Challenge. I had been playing with designs for our kitchen since we moved in two years ago but was always stumped on the tile. I knew I wanted something interesting (not white subway), with clean lines suitable to our midcentury modern home, but I’m drawn to textured, handmade finishes. It also had to be in stock to meet my deadline. When I met with the team at Natural Stone, I described my impossible wishlist and they looked at each other, nodded, and led me to the back room where a new line had just arrived. The team introduced me to the Seamless Decor collection and I knew we found it. They have the look of encaustic cement tiles, but are made from durable porcelain with a matte, organic finish. The bold pattern would have been overwhelming if we went up the entire wall, so we opted to use the 1×1 mosaics from the same collection behind the shelves. I. love. it. and am so grateful for the folks at Natural Stone.
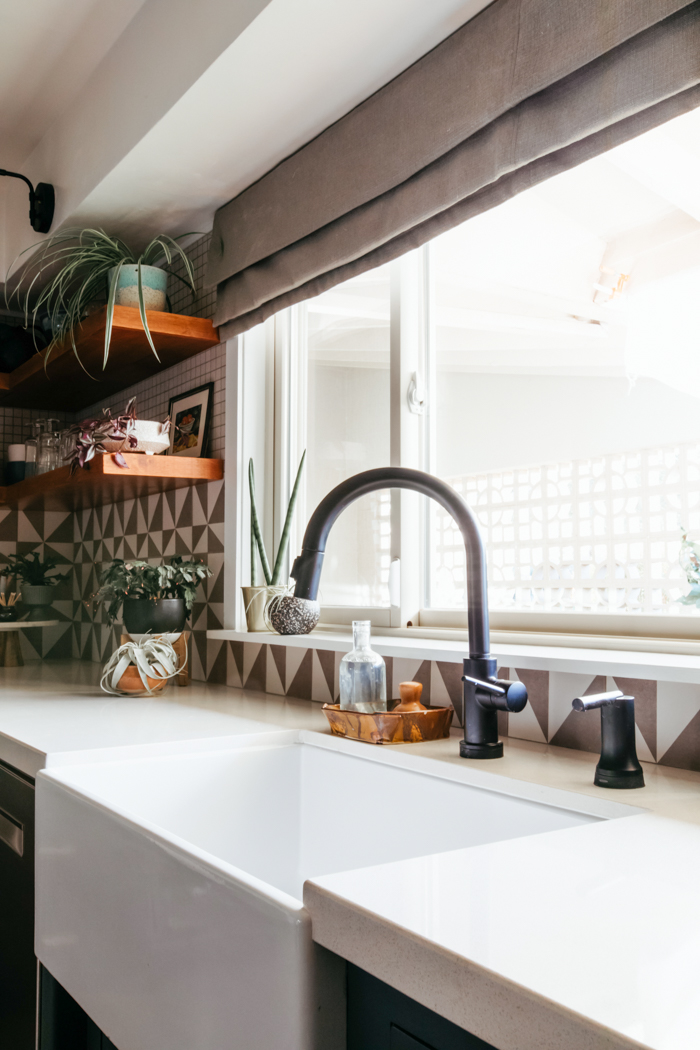
The next biggest showstopper is this sink situation. Its a farmhouse/apron style, but very simple with crisp corners to keep it modern. The faucet is touch-activated which is my favorite thing when you’re hands are full and messy.
When I saw this house for the first time, the kitchen was obviously outdated, but the bones were perfect. The flat inset cabinet style is exactly what I would have designed myself so we were lucky that we could throw some paint on them and they look completely fresh and relevant. I wanted the lowers to be dark gray, but read blue sometimes so Nocturnal Gray by Benjamin Moore was the perfect solution. We actually don’t get great light in here most of the day so I wanted the tall cabinetry to be light and bright, so painted them the subtle Classic Gray, also Benjamin Moore. Finally, all walls are painted Simply White.
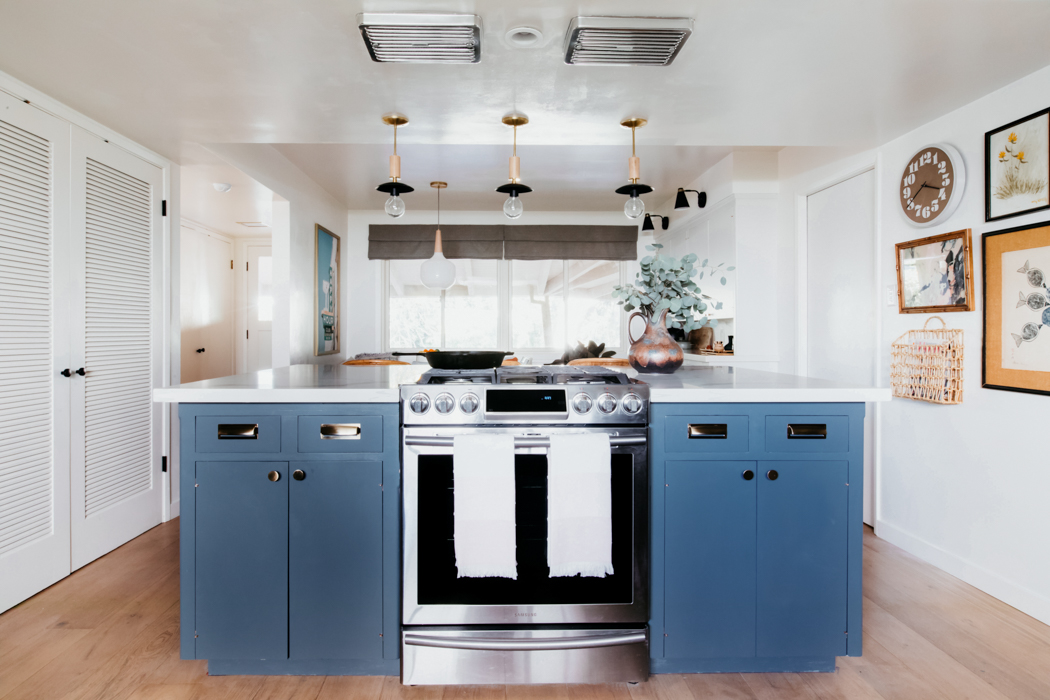
Next up, the lighting has added so much form AND function to the room. The little pendants over the island were customized to work with our drop soffit by DL Designworks and I love the funky minimalism style. The shop was super great to work with, made my adjustments easily and shipped my custom order quickly.
I already owned the little brass chandelier and dining nook pendant (both from West Elm), and both bring that updated midmod feel to the room.
 You may remember the overhead sconces were not working for me when they were originally installed. The top cones were too tall for the area and made them feel tight and cluttered. I panicked for a minute then realized we could probably take them apart and remove the extra flared cone. It worked! To give them a finished look, my dad spray painted Tejava bottle caps black and siliconed them to the top. Yes, those little black rings on top of the lights are plastic bottle caps and its impossible to tell. 😂 Since the lights are LED they won’t overheat so are completely safe. I love how they light up the work surface and shelves.
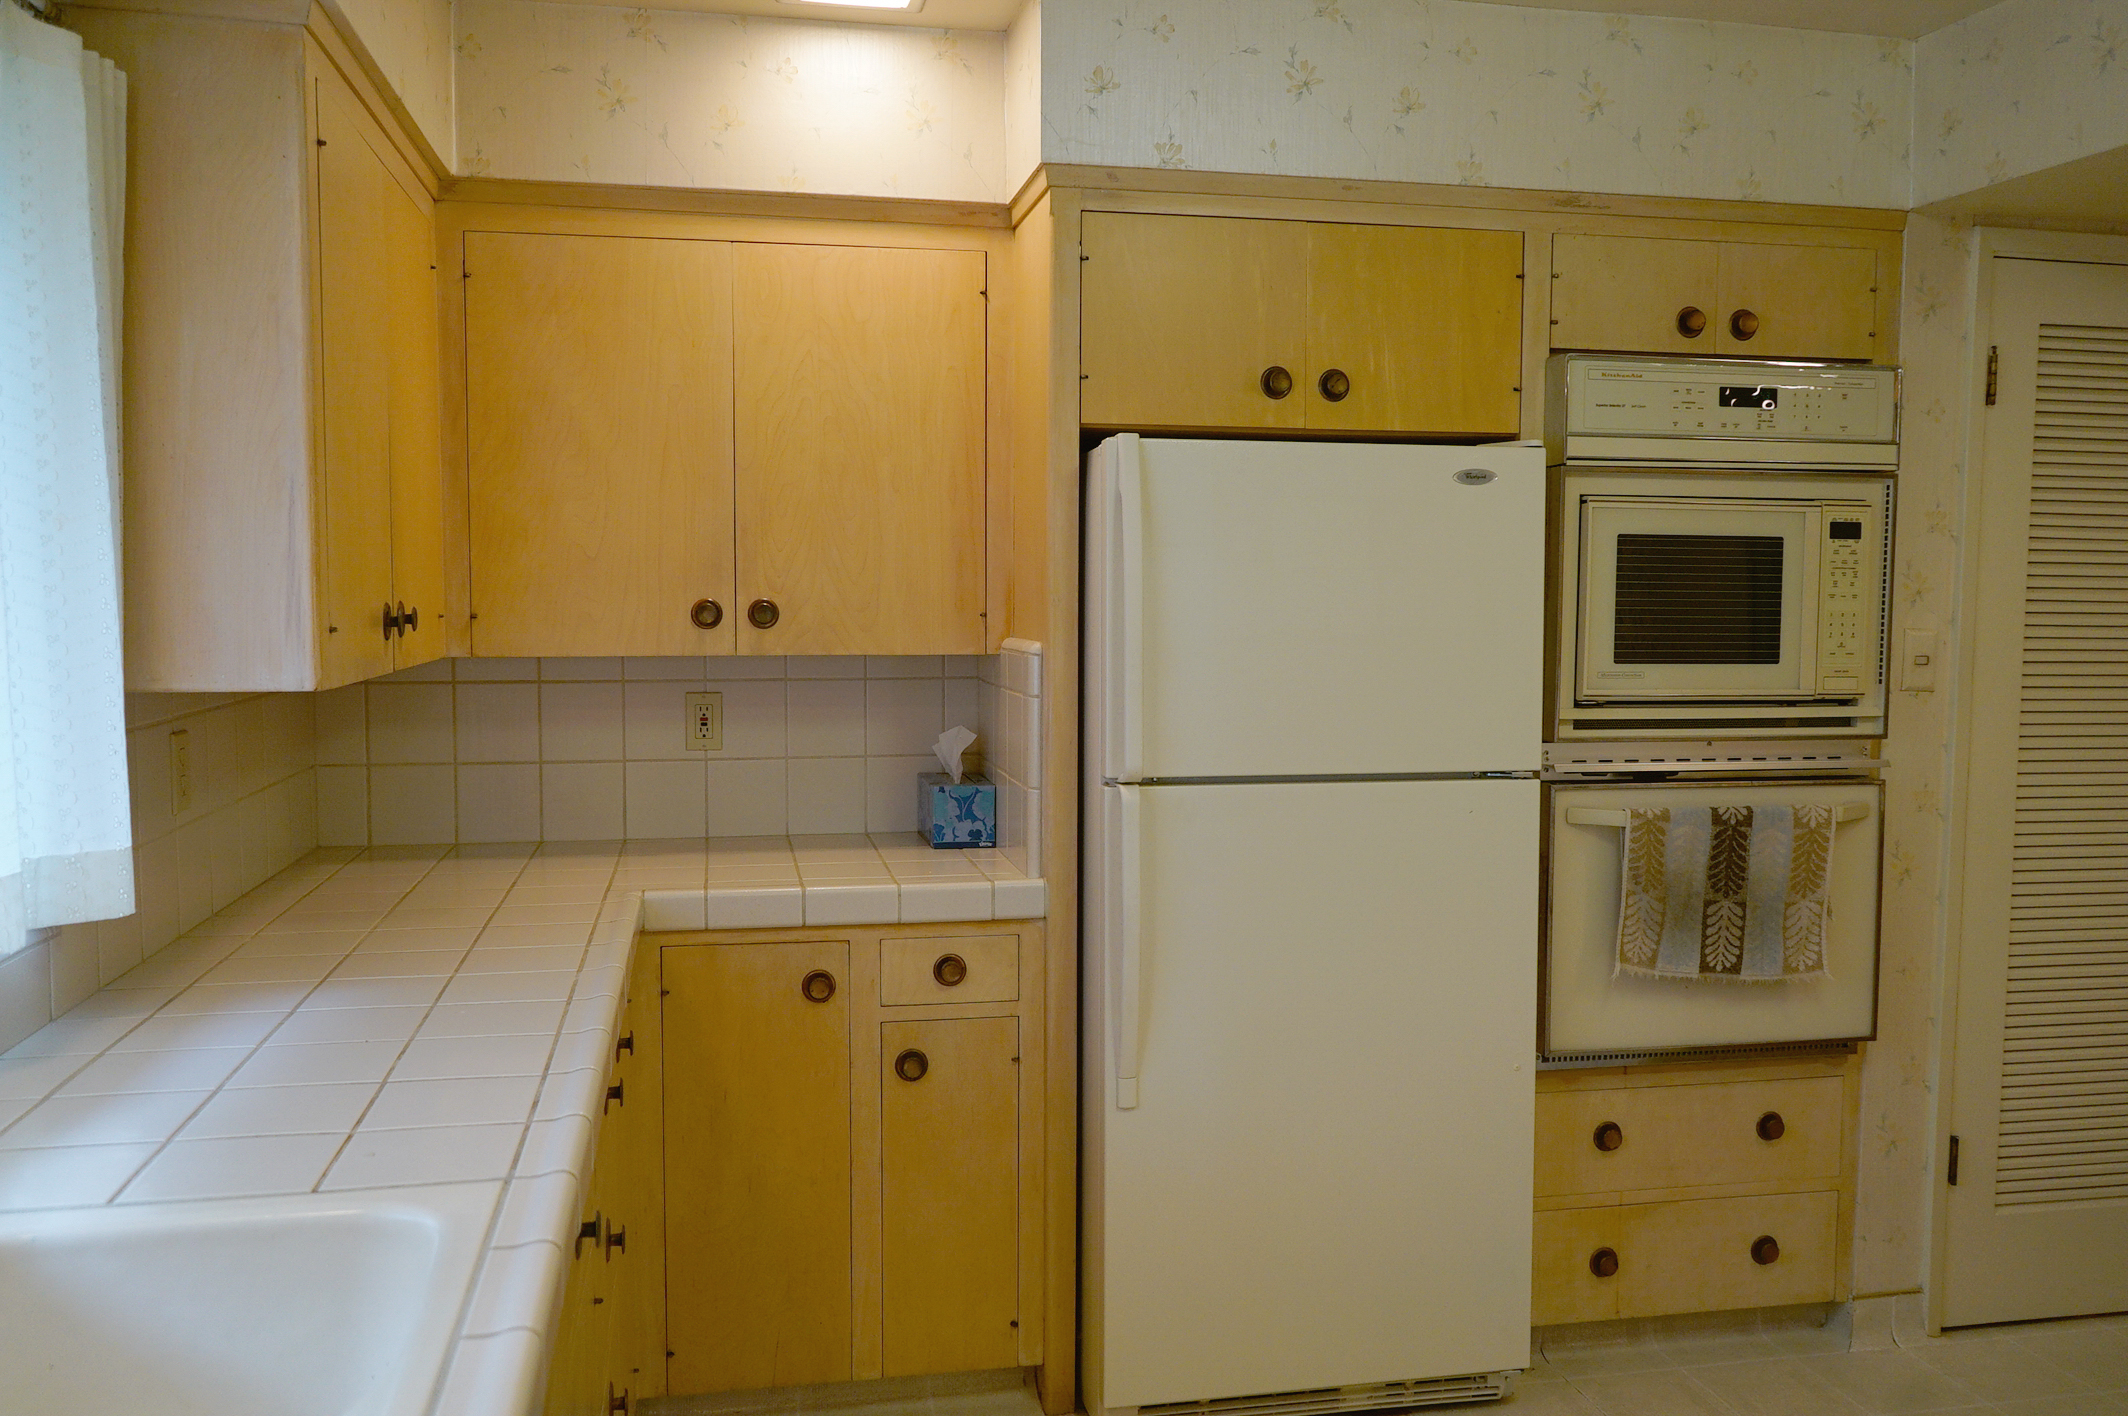
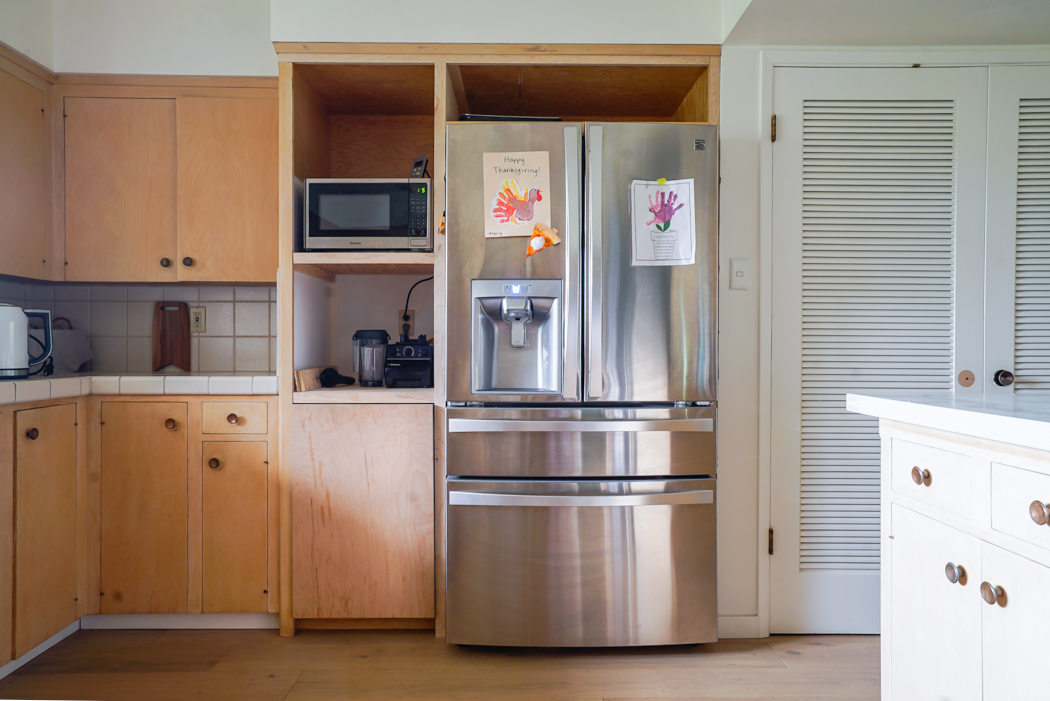
The only area we really reconfigured was around the fridge. Here’s how it looked when we bought it…
Last year we made room for our 21st century American refrigerator but never completed the project. Here’s how it looked until 6 weeks ago…
Here’s that same angle now…
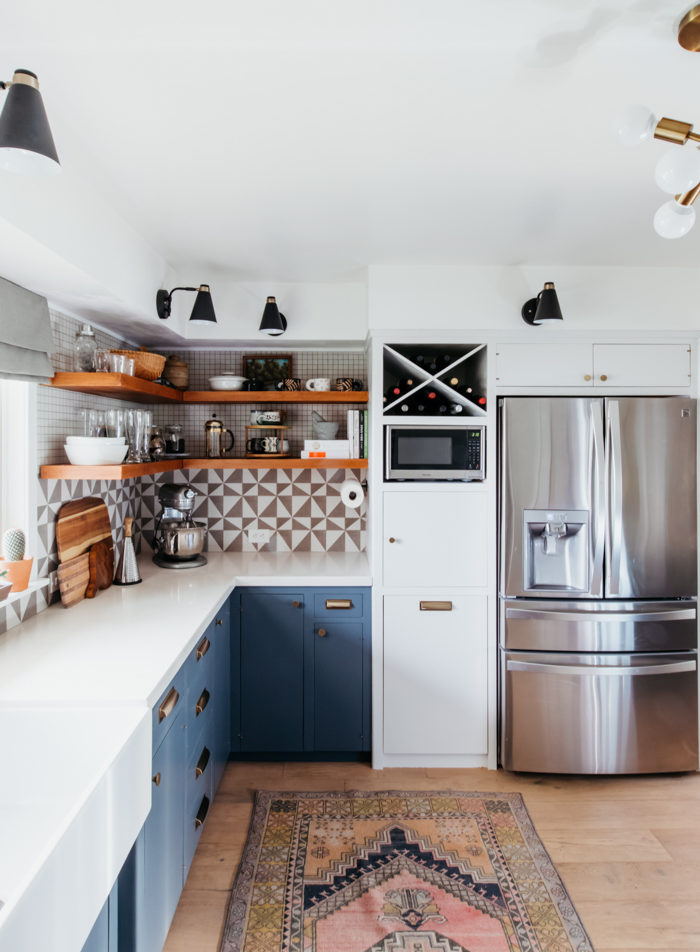
Now the pull-out trash can is soft-close (with actual hardware), there’s a retractable door for a little appliance garage, and we have wine storage. The fridge also stuck out too far into the room so we pushed it back about 6 inches into the closet behind it. Yesss…
Dining Nook
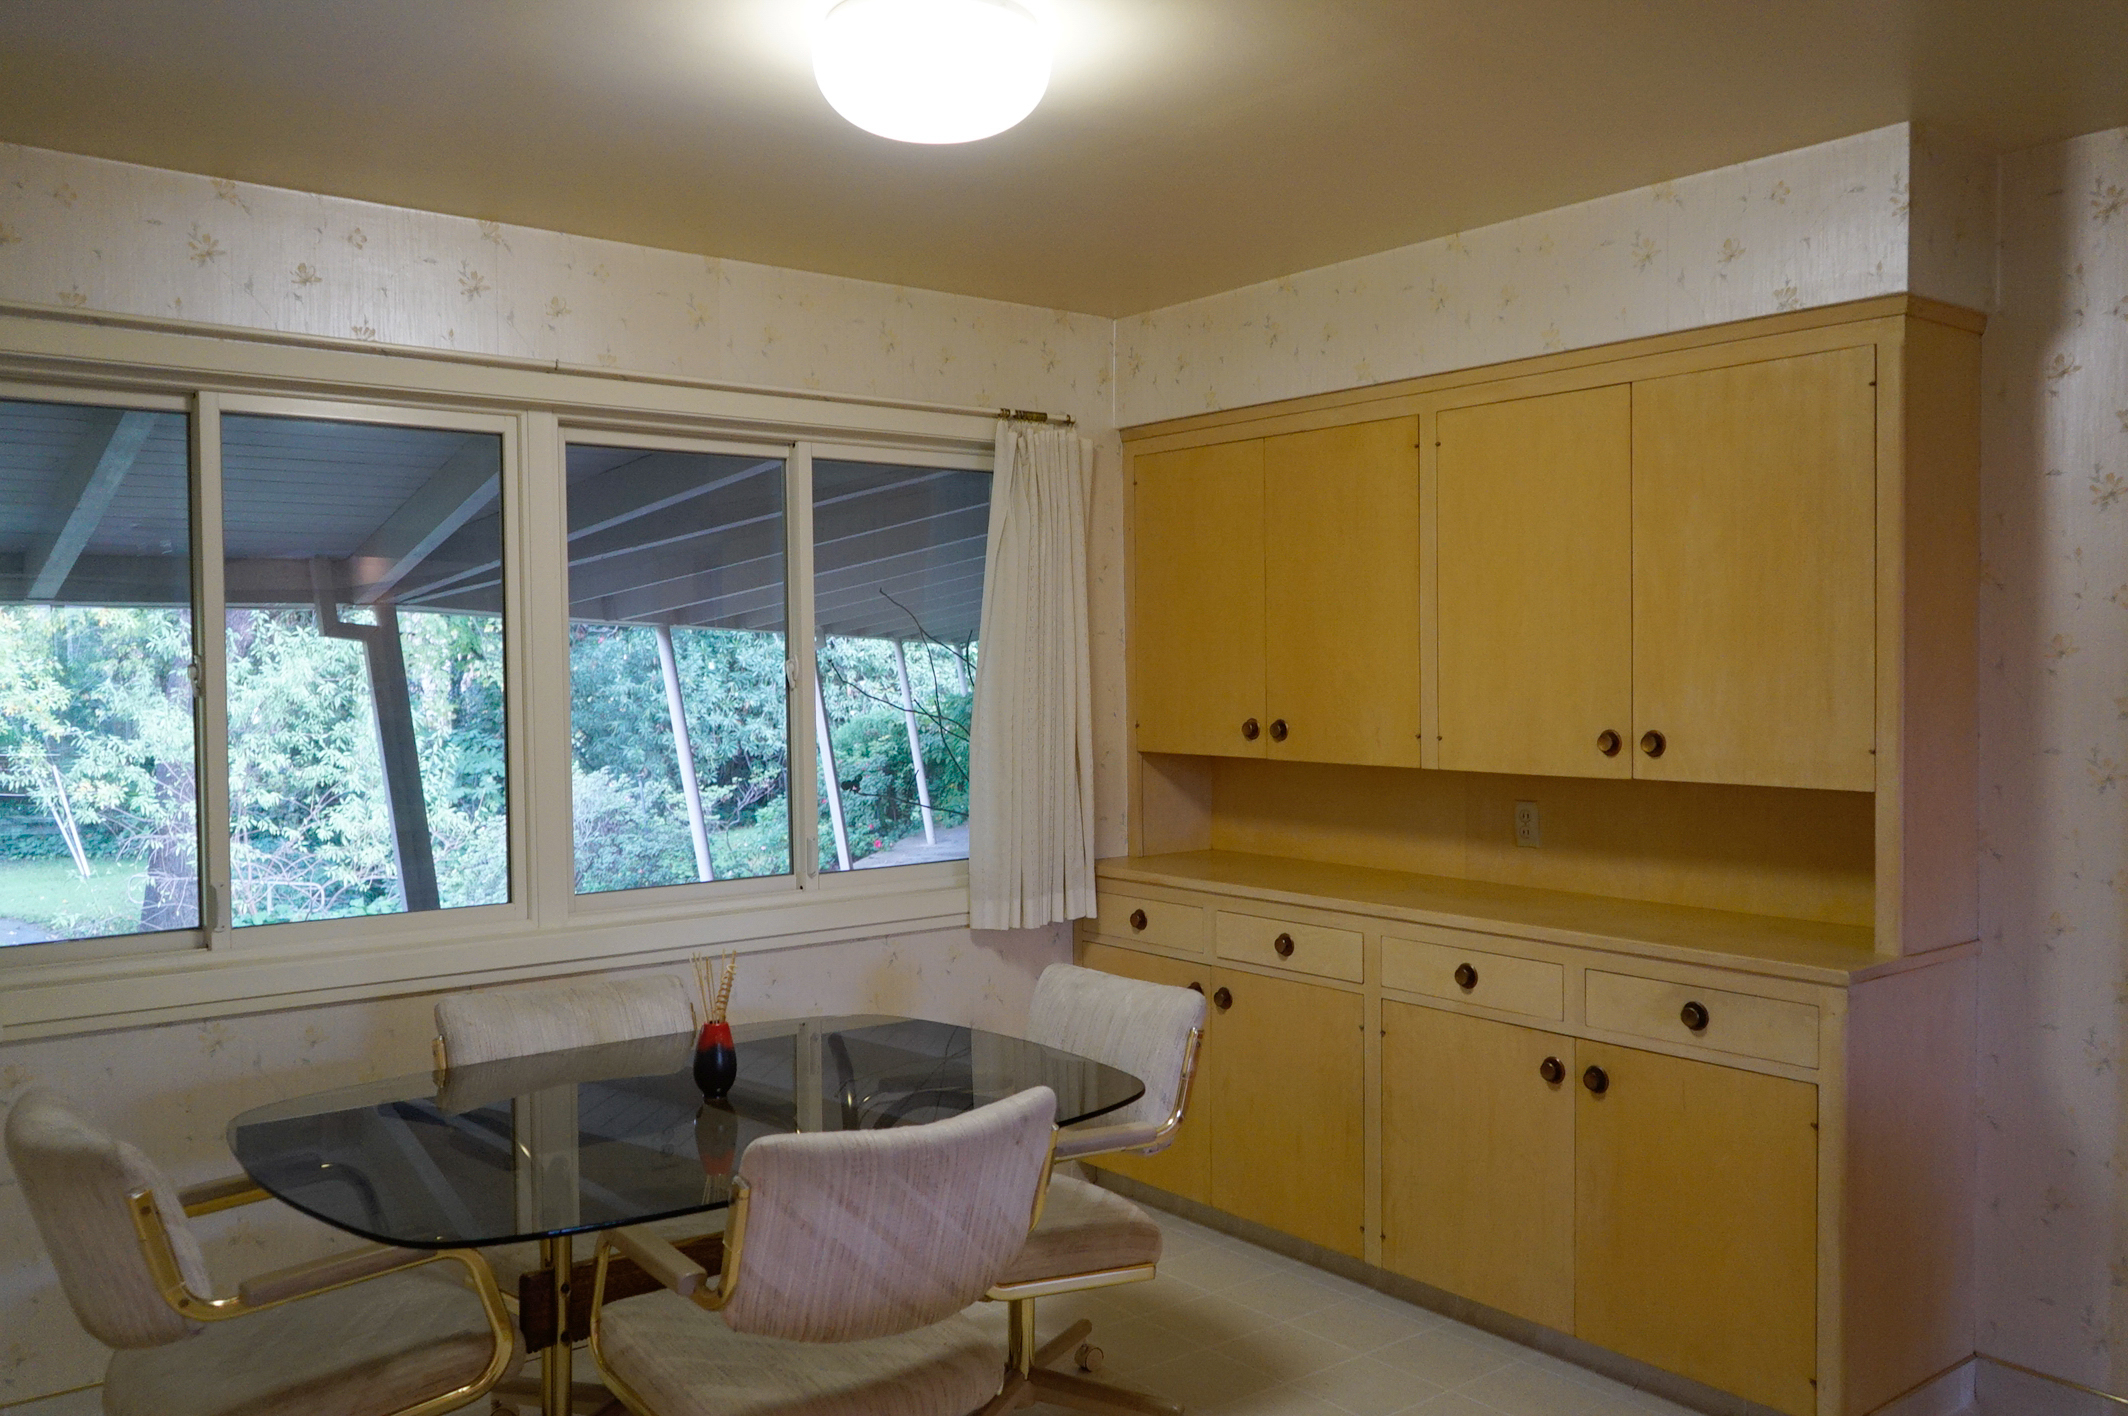
Our eat-in kitchen gets used every day, but again not to its potential. It was ok, but for the most part just once again, blah.
Before…
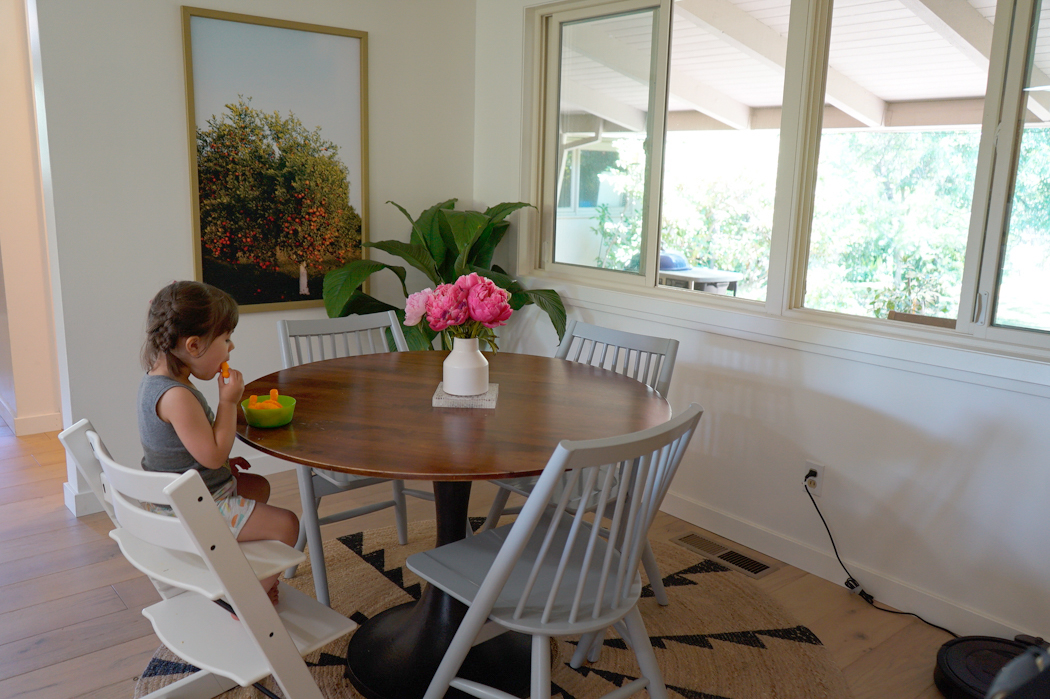
After!
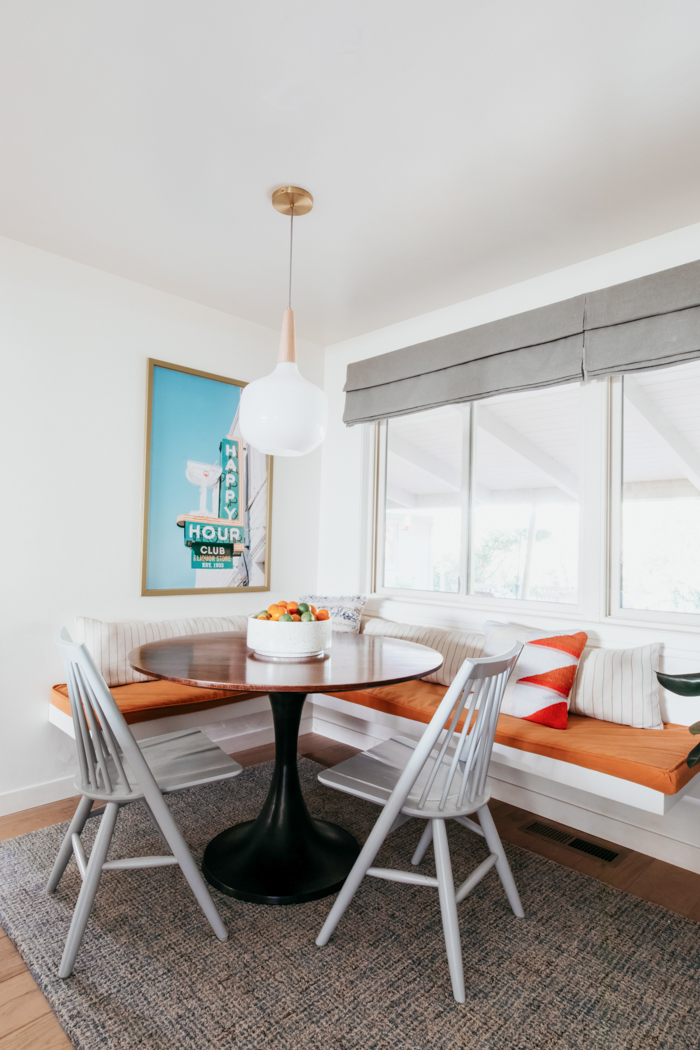
ohmergawd I love it so much. I’ve always wanted a banquette over here to maximize space and give the built-in buffet some breathing room. We have plenty of storage so I became obsessed with the idea of a floating bench to keep it feeling airy. Apparently its not easily done, but thanks to my dad, he found some super duper brackets and fastened them to the structure of the house.
The rug is brought to you by my friends at Surya. Its the softest, cushiest wool and makes this corner so cozy when you sit at it. The tight pattern goes with everything and will hide spills that happen. We repositioned the light fixture, and kept our existing table and chairs for now. The Happy Hour print is a photo I took of a sign in old downtown Auburn. One of these days I’ll get my shop up and have them available for sale.
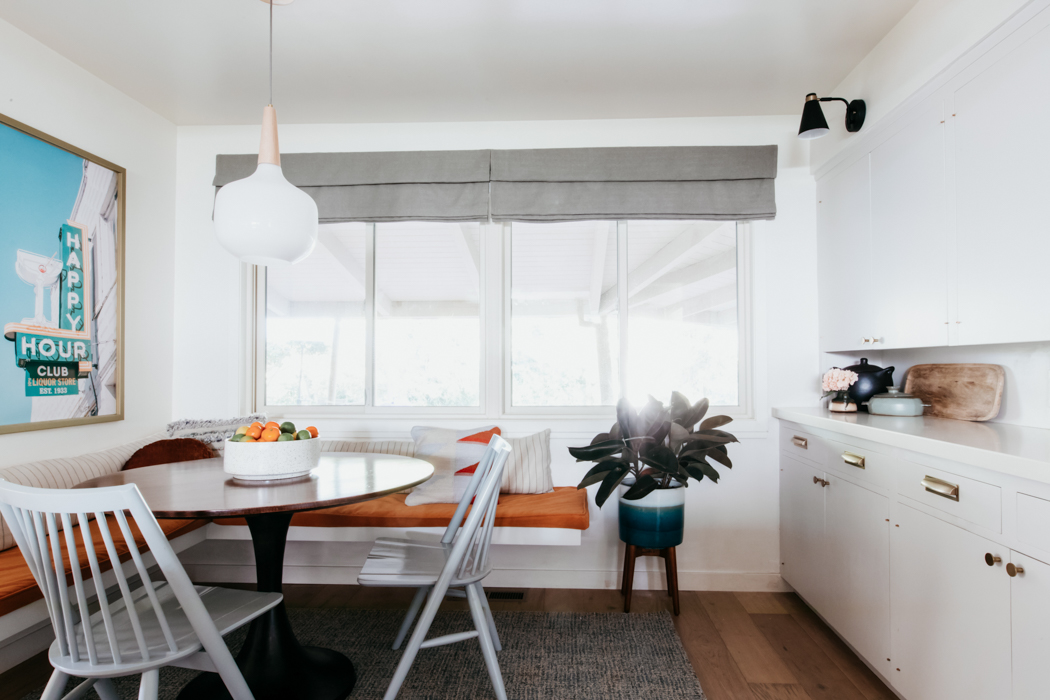
I owe the beauty of this whole corner to my mom. She’s super creative, and can figure out how to sew anything. BUT if there’s a deadline and any kind of pressure involved…let’s just say its not her favorite. So thank you mom for sewing (and resewing) the cushions and fauxman shade–they’re perfect. We found this muted orange velvet at my favorite discount upholstery fabric gem right before they closed their doors forever (RIP Triad Plus) and I dug up a remnant I’d been hoarding for a couple years for the lumbar pillows. Yes, the shades don’t actually pull down, but these windows are non-standard and incredibly wide (i.e. $$$$). We don’t really need the privacy so this solution works for now. I love the way they make the space feel finished and tailored.
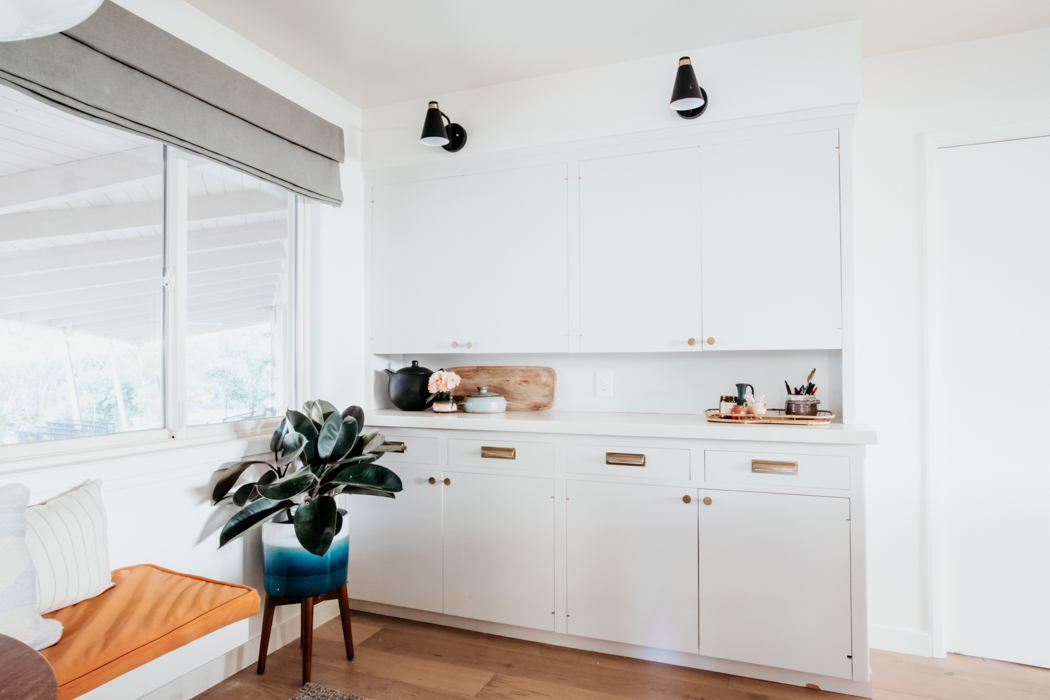
I made a last minute decision to add sconces over the buffet and they shed much-needed light over here and complete the corner.
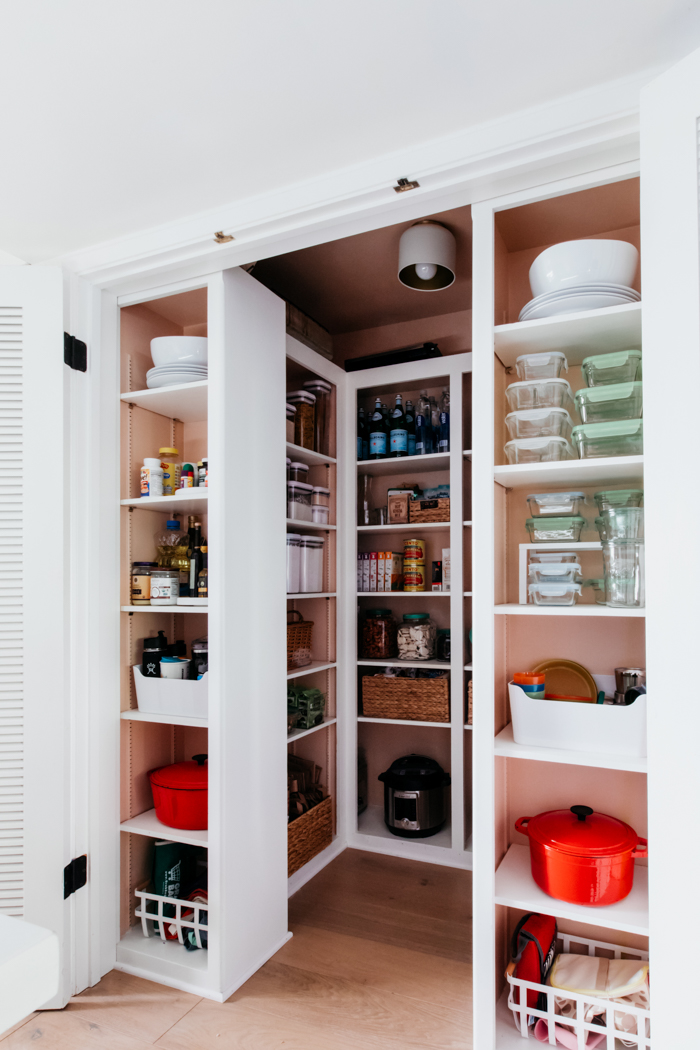
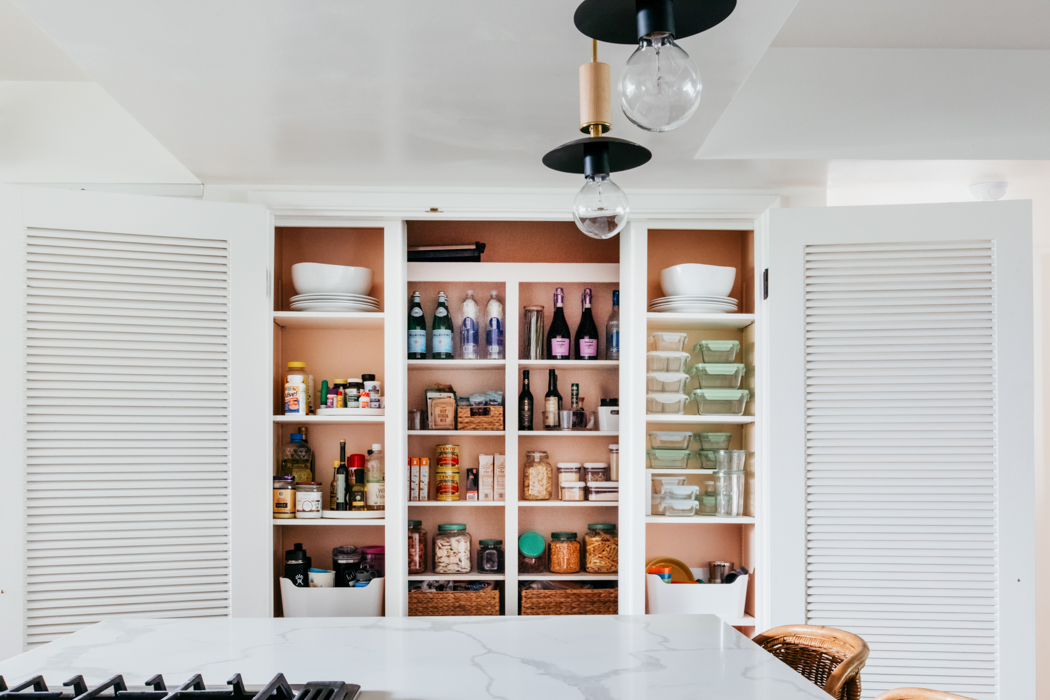
Pantry
At some point I realized I was basically working on 3 rooms (main kitchen, eating nook, pantry) so I brought in some help on the pantry. I was introduced to Carly from Tidy Revival at a local Blog Bloc mixer a few months ago and knew I had to find a way to collaborate with her. This pantry might have been the clincher for me to buy our house. I’ve never lived in a home with proper food storage and the double tier floor-to-ceiling shelving was a dream come true. But I hated the rest of the kitchen so much I never took the time to organize it.
It got real bad guys…

Then Carly came over with her notepad, measuring tape, fresh perspective and made it all better. So much better. After lots of purging and several trips to the Container Store it all came together. We can find things! It looks pretty! Everything has a home!
I know some of you are going to be wanting more #pantryporn so I’ll have a whole post about it soon. 🙂
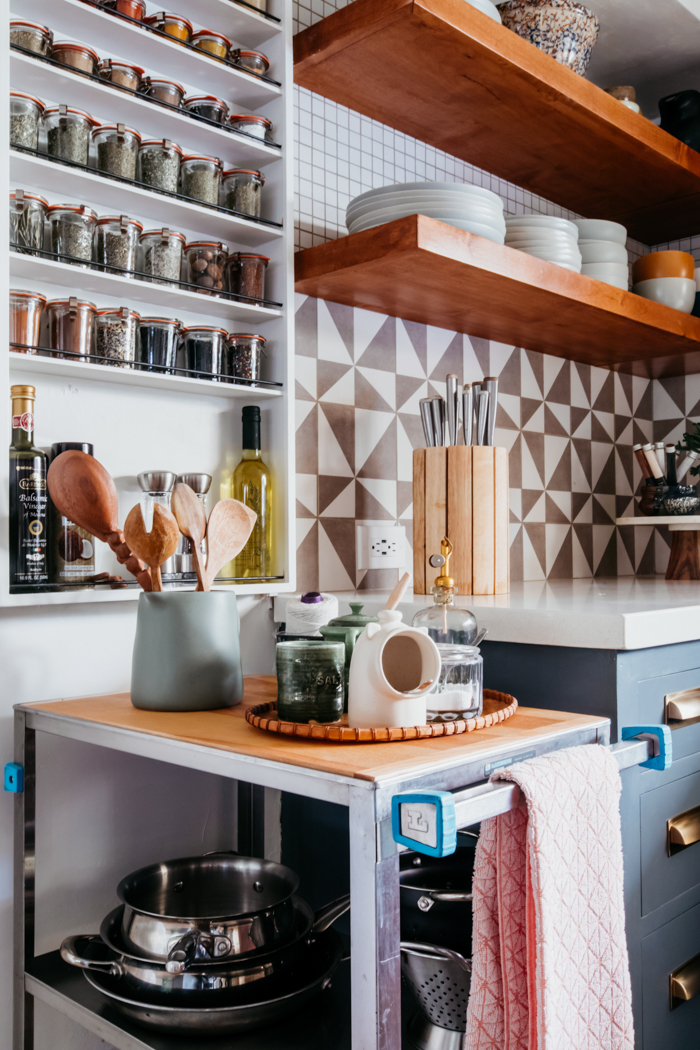
Basically every part is my favorite part, but the spice rack was one of those mistakes that turned into a lucky break. We had a big issue when the counters were delivered the wrong size and left a .5″ gap between the wall. Argh. Instead of rebuilding the entire wall, my dad made it a niche of sorts and built a custom spice rack. Then I hit up my friend Heather at Allspicery and she made the most epic spice collection of all time. Its so beautiful, so fun to use and inspires me to cook more already. Isn’t it gorge!!?
I agonized over the hardware, but think this midcentury-inspired brushed brass pulls were made for these cabinets.
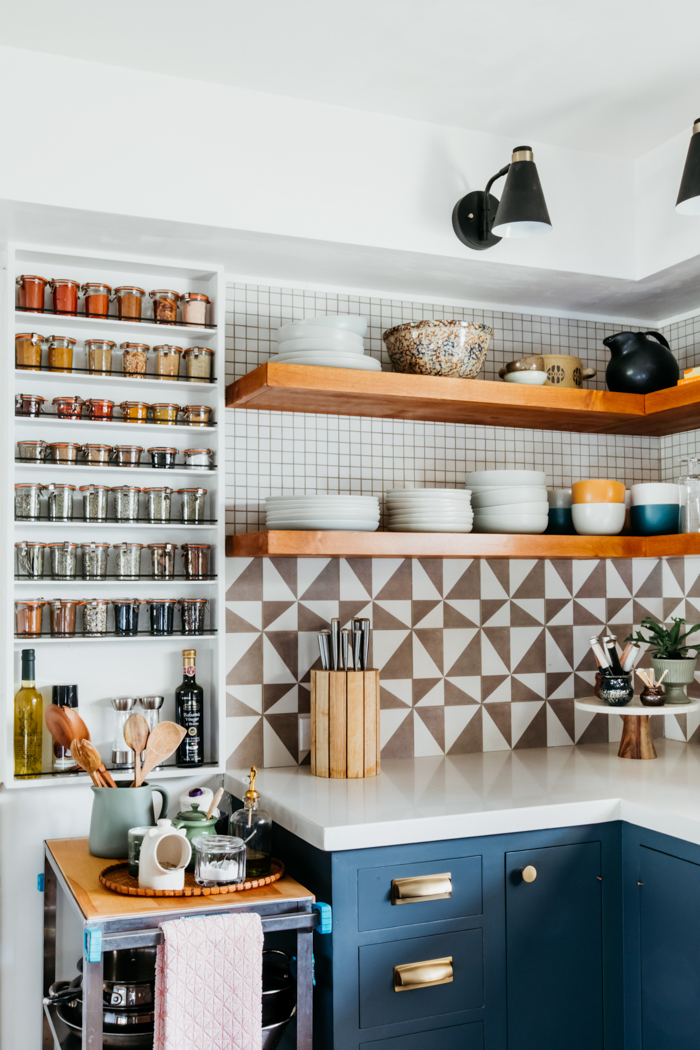
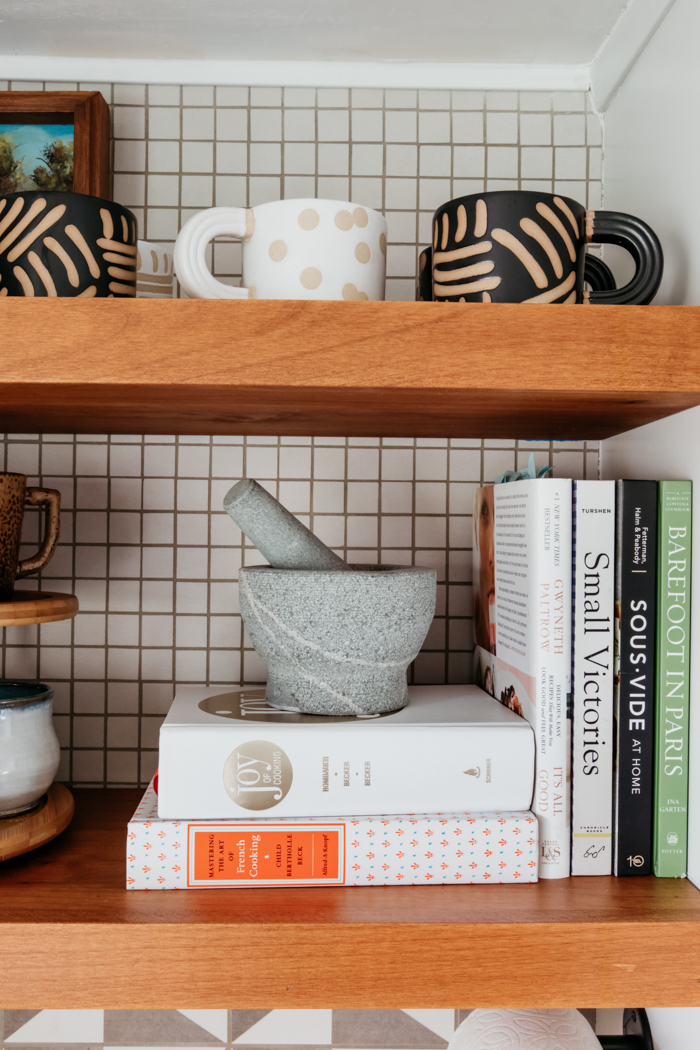
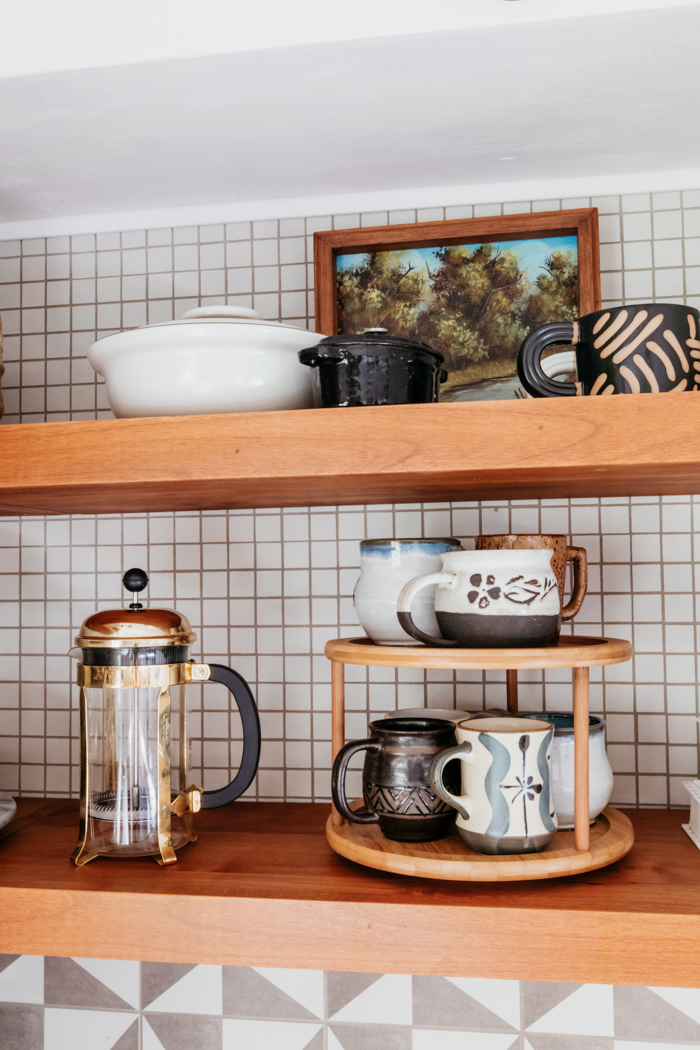
Let’s talk shelfie for a minute. Once again my dad built these beautiful shelves and they are the perfect solution for our everyday dishes as well as displaying my collection of vintage/thrifted pottery and ceramics.
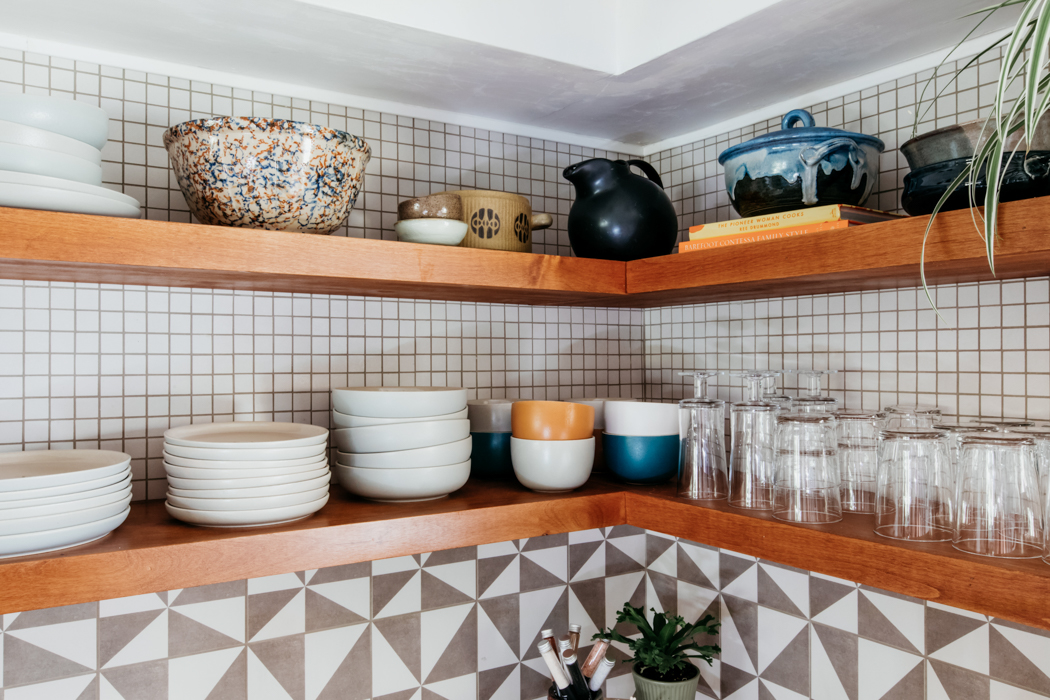
The plates and bowls are from West Elm Sacramento and I’m obsessed!! They are the perfect shape, have an organic pebble finish and a blue-gray color I love. The cereal bowls come in a moody color assortment that are so fun to mix and match.
These black and white exposed clay mugs are also from West Elm Sacramento and just the best shape. That handle, the graphic organic pattern. Love.
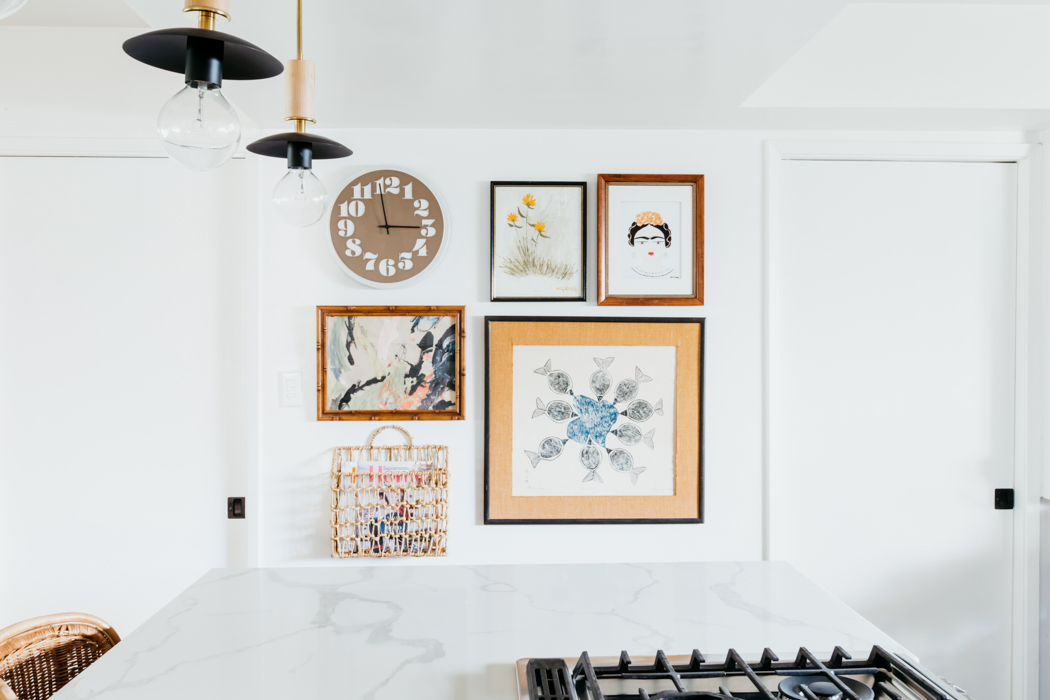
Speaking of vintage, if you follow me on Instagram you know I’m a treasure-hunting addict. My go tos are funky ceramics and art /frames. If its a little weird, I probably like it. There isn’t a lot of room between this wall and the island so when redesigning I decided to forgo function for the most part and just bring in a gallery wall.
We painted over the chalkboard wall that was never used and I started collecting. Clockwise from top left // Clock: Our ‘its about time’ wedding gift from friends / vintage oil painting / Friday by the talented local artist Heather Felder / vintage bird art / basket from Home Goods / art by my 4 year old, vintage frame
Don’t kill me, but the counter stools are vintage. I almost passed out when I found them at an antique mall by my house for $150 (for all 3!). I LOVE how they bring organic feel to the island and tie into the other natural woods and wovens. Fun fact, I didn’t realize the bases were different until epette noticed during the photoshoot.🤦🏽♀️ I think the middle one must have been repaired at some point, but I actually don’t mind the variation.
So that’s a wrap, friends! I’m so encouraged to do another room in the spring and I promise to keep sharing as much of the behind-the-scenes as I can on future projects.
Thanks a billion
My dream kitchen would never have happened without the village of help I had. This was my first One Room Challenge and taking on a kitchen in 6 weeks was basically an extreme sport.
I have to thank my dad Steve first because out of all of us, he worked the hardest. He didn’t hesitate when I told him about the challenge and he took the lead on this project with me. He made endless Home Depot runs and worked his 73-year-old fingers to the bone. He built the floating shelves, problem-solved a million things, made the spice rack and came up with the ridiculous idea of using Teavana bottle caps on the fixtures. What room are we going to do in April, pops?
Lots of love to my husband Terry who may not always be overjoyed by my ideas, but stays out of my way when necessary He doesn’t usually see the vision until the end so I’m extremely grateful that he trusts me. My mom of course, who lets me push her out of her comfort zone on a regular basis and taught me about creative problem solving. Robert Davis, was both the entertainment and the jack-of-all trades handyman. Thank you to my friend Wendy who helped paint and took on Auntie duties when necessary. And finally my Fairy Blog Mother Kachet Jackson-Henderson who mentored me through my first foray into the big leagues of blogging. Renovating a kitchen is one thing, blogging and sharing about it cohesively is another!
Most of all, thank you to Linda for organizing the One Room Challenge and the official ORC media partner Better Homes and Gardens for giving some of us little guys a platform to share and meet like-minded folks. I connected with so many of you through this process and can’t tell you how helpful that was to get feedback and encouragement along the way. Let’s do it again!
All photos by Nicolette Lovell // Design and styling by me, Rebecca Plumb
Catch up with our entire One Room Challenge kitchen reno
Week 1 // Week 2 // Week 3 // Week 4 // Week 5 // Week 6
Thank you to my partners!
Please take a moment to support those who supported me on this!
Sources
Main kitchen area
Pattern tile // Sink // Faucet // Soap dispenser // Sink Rug (vintage) // Cabinet Knobs // Drawer Pulls // Sconces // Chandelier // Island pendants (customized) // Dining pendant (no longer available) // Plates and bowls // Mugs // Counter Stools (vintage) // Clock // Frida art // Spice jars
Paint Colors
Dark Cabinets //Light Cabinets // Walls
Dining Nook
Rug // Tall Plant stand(similar) // Dining chairs (similar)// Round pillow // Graphic pillow // Dining table (no longer available)
Now I’m going to spend the rest of the day seeing what the Featured Designers and other Guest Participants final rooms look like!


37 thoughts on “Kitchen | One Room Challenge :: Week 6”
Isn’t this the cutest kitchen I ever did see? Great work!!!!
It’s so gorgeous!! Your ability to see the possibilities always amazes me. Can’t wait to see it in person!! Congratulations!!
Girl!!! This looks so freaking awesome. I love all the different textures and the cabinet colors really pop. Great job.
I am floored!! What an incredible, thoughtful, tasteful, practical, BEAUTIFUL transformation! Well done, team, and thanks for bringing us along for the ride, Rebecca.
It’s just so incredible. That backsplash! The spice rack! The pantry! THOSE STOOLS! Well done, my friend.
Such an amazing transformation! I am so impressed by your vision and bringing it to fruition..Great Job Rebecca!
Great job, love that opening shelving and the custom spice rack it really adds a nice look to your kitchen. The entire project looks amazing and you really did great job!
Your kitchen looks amazing. You did such a great job, and I love how your dad helped you. I especially love the floating shelves and those vintage bar stools.
so freaking good! You must feel amazing after that transformation!
This is truly #kitchengoals The transformation is amazing! Congrats.
WOW. wow. wow. oh wow!!! It’s fabulous!!! Great job, Rebecca. I love every single thing! ~~ Susie from The Chelsea Project
You (and your family) did an amazingly outstanding job. Perfection, if I must say so.
I’m so incredibly impressed! I love this whole renovation, how you re-used what you could and got creative! Plus that pantry!!!
I just finished my orc master bedroom- but it was nothing compared to this! Congrats and enjoy your new kitchen!
WOW! What a beautiful transformation. I am in love with the backsplash tile.
Wow! So many amazing details. I love the cabinet color!
I love how your kitchen turned out! It’s still mid century but also modernized. And that pantry!! Beautiful!
What a transformation, Rebecca! Enjoy this fabulous kitchen!
It looks amazing! Great job!
Wow! It’s beautiful – love all of it. I can’t believe that’s the same kitchen!
This is great! I love the tile and how all of the colors work together. Those stools were a fabulous find!!!
So well done!! I love your tile choice it pops in the perfect way. Huge congratulations!
Omg! This looks so awesome. I love the color of your cabinets and all the fun details, art work etc. You did an amazing job!!! Best of luck with this kitchen and I hope you’ll make wonderful memories in this kitchen. Btw If you’re hosting Thanksgivings this year I would love to come!! 😉
I am so excited that this day finally came and I can check out all the amazing transformations and enjoy my new master bedroom as well. Yay, we did it!!!
OMG, Rebecca! I knew it would come together beautifully but wow!! I have so many favorite parts but it’s definitely the spice rack. Way to take a problem and turn it into a star of the whole room! And that pantry… can’t wait to see more of that. Kudos to your whole family for working so hard and making this a reality. What a great memory for you all as well as a great room! Btw I want to come thrifting/antique faire-ing with you sometime! Show me your ways!
What a dramatic and fun transformation. I love the darker cabinets. You did a great job! Enjoy the fruits of your labor!
You just blew my design mind 🤯🤯🤯 this is a wildly fabulous transformation!!! Night and day! Beautiful work 👏🏻
I absolutely love every choice you made. That backsplash is everything. The built in bench and shelves are so cool, your dad is awesome! I’m so glad you were able to keep the original cabinets! Congrats!
It turned out so beautiful! I haven’t seen another ORC kitchen like it so far. Those tiles are great, and the spice rack is awesome!
Excellent job! Kudos to you and your handy family. An “its about time”clock is such a cute idea for a wedding gift haha.
Boy oh boy was I ever excited to see this transformation! You really had your work cut out for you, and boy did you ever rise to the challenge! Thank you for including all the photos. They really help us to see the changes and where things were moved. I love every inch of this. Enjoy your new space!
This is just amazing! So many good things in this space! Also great photos, it is just a joy to look at!
I love the rug and window treatments too!
Gorgeous job!! Love the tile work and open shelving! It all came together beautifully 🙂
Beautiful transformation. That tile is gorgeous
All I can say is I’m jealous I don’t live in this space! Love, love, love it!
What brackets dod your pops use for the floating banquette?? We’re looking to do the same project!
I ordered from Countertopbrackets.com. They’re heavy duty!!
I was recommended this website by my cousin. I am no longer sure whether or not this
publish is written through him as no one else understand such special about my problem.
You are incredible! Thank you!
The loveliest faces are to be seen by moonlight when one sees half with the eye and half with the fancy.